Documentation Template
This documentation template provides contributors with the necessary components and a standardized format in one file for structured writing. Contents include:
- It introduces the idea of a template first,
- provides you with guidelines for documentation writing and
- presents highlight elements for a harmonized appearance of documentation throughout the manifold software documentations provided through mk-docs
How to use this template
First of all; you don't have to worry about the whole template. We built this template by starting at the top with the essential parts that you should definitely take care of, and will come the optional parts that you can take care of.
Essential parts:
- Check, if all necessary sections are included. (Done by developers)
- Check markdownlint issues (Done by developers)
- Check the documentation if the corresponding personas, like "Edge User" (OT Otto, Erdem Edge Operator) and "Andy App developer" or "Devid Device Builder" are addressed (Done by developers together with Technical writer)
Optional parts:
- Check the documentation, if it is written from customers point of view (Workflow and context information) (Done by Technical Writer)
- Check that the number of screenshots is appropriate to guide users, e.g. if there is a huge amount of text only, or if the content is very complex, etc. (Technical Writer); Use necessary and suitable screenshots only.
- Check that the titles are written in a use case based style.
Sections to be filled out
- Purpose of this document (What is this piece of documentation about? Who is it for? What does the user know after reading through this?)
- Prerequisites (What are the prerequisites of the user to successfully perform the steps?)
- Procedure: Step-by-Step or Description (What does the user have to do to get the result?)
- Result (What is the status after the successful implementation?)
Starting Point (Introduction = Header)
This section describes the starting point of the user, where a contributor to content or a technical writer aims to create a new or updated version of documentation. Documentation will include some general descriptions of software installation, deployment, configuration and the like. To write your texts, you will set up a new mk document in English language and use several elements to structure your text, namely:
- Text
- Bullet points
- Pictures / Screenshots and pictures with highlights
- Videos
- Code snippets
- Notes
- Boxes
- Tables
- Copying Code Snippets (Copy Icon)
- Program code
Elements of documentation pages
All the above mentioned elements to make documentation vivid and easy to read will be depicted in detail below.
Text blocks
Text passaged should be precise, short and structured into paragraphs. The optimal length of a sentence is approx. 20 words. Please use pictures, bullet lists, tables etc. to make information easily accessible and readable already at a glance. Paragraphs will always have two or more sentences. For highlighting specific words, bold font is advised. Use “Quotes” to indicate that you are talking about a specific command or section. Icons can be integrated. All available icons can be found here: [link] . Links can be used in-text or in a new line, to stand out. Links always need to be presented as a description of the target rather than the link itself.
Bulleted lists
In documentation, it is good practice to avoid long narrations as in long text passages. Bulleted lists are easier to read and should be formatted in a lean way. It is advised to use a colon before starting the list or in the list, as the picture below illustrates. Good lists show the following characteristics:
- Start with a capital letter in each bullet section
- Keep a similar style of sentence structure in each section
- Show a minimum two bulleted sections
- End openly, i.e. they do not end with a pull stop
Numbered lists
Use numbered lists to structure action instructions in a sequence.
- Start each action item with capital letter and write as sentence.
- Start with the verb and avoid "you".
- Don't use temporal words like "after that", "then", "at the end", which are redundant to the numbered list.
-
If there are interim results, add an intended line.
Describe the state after the action in the indented line.
quote "Markdown code"
```
-   Start with a capital letter in each bullet section
-   Keep a similar style of sentence structure in each section
-   Show a minimum two bulleted sections
-   End openly, i.e. they do not end with a pull stop
```
Guidelines for Input, Using Pictures and Screenshots in Documentation
Relevant content
Please provide the following, especially when delivering input for a new product or feature:
- Concepts (what is it)
- Prerequisites (what is needed)
- Procedures (how to do it)
- References (put into APIs & References and link to it)
Content should follow a task-oriented structure, prioritizing actionable information with step-by-step instructions, supported by diagrams, screenshots, or flowcharts where necessary. Use cross-references to other topics to link related concepts.
Screenshots
Screenshots are used for orientation in the software and speed up the implementation of instructions. They give the user the certainty that they are in the right place in the software. Use screenshots sparingly for the following cases:
- To illustrate the structure of the software (e.g. overview, start page as a starting point before an instruction).
- Point out important functions in the software (e.g. icons).
- Display complex results of an instruction (e.g. overview of settings)
Avoid including screenshots in individual instructions. The UI usually guides the user through the individual steps. A minimal description is sufficient for this.
When including images into your documentation, follow these best practices:
- Use pictures for complex content:
- Visuals can simplify complex concepts. Use images to explain complex information in a simply way.
- Emphasize steps with screenshots:
- Screenshots are great for highlighting navigation steps or demonstrating processes.
- But: don't screenshot every step in the UI that is already self-explanatory.
- Background and transparency:
- Ensure the background is white (hex code: #ffffff).
- Images must not have transparency.
- Resolution (solution) for screenshots:
- Use 120 dpi (dots per inch) for screenshot resolution.
- Icons: max. Hight = 5 mm
- Paragraph images: max. Hight = 145 mm
- Big images (use rarely): max. Width = 175 mm, max. Hight = 205 mm
- Display only necessary information:
- Be concise. Show only relevant details.
- Content of images:
- Capture screenshots of the product or create clear drawings/concepts.
- Avoid using PowerPoint presentation screenshots.
- Consistent numbering:
- Maintain consistent numbering style (color, size) for any labels or counting numbers on screenshots.
- Explanation text placement:
- Position explanation text away from the center of the image.
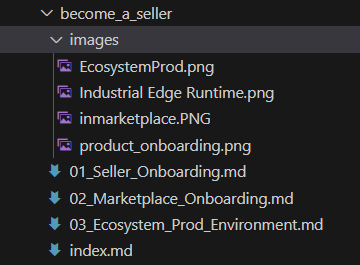
- File format and storage:
- Save images as .PNG or .JPEG files.
- Store them in an “images” folder at the same level as your Markdown file.
NOTICE
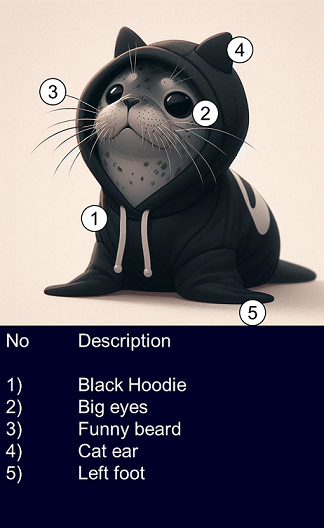
Highlighting pictures
For highlighting element in pictures, please use plain boxes in color orange (R 255, G 144 B 0 / hex code: #FF9000) in outline weight 1,5pt with rounded edges. For numbering of highlighted sections, please use position numbers a black and white oval, no filling, size 8pt.
NOTICE
To ensure quality, don't change the solution of the screenshot afterwards.
The file can be displayed with the following code snippet:
Markdown code

Videos
Embed videos to the page is simple and fast:
- Search for the video on e.g. Youtube
- Click on the Share-Button and choose Embed
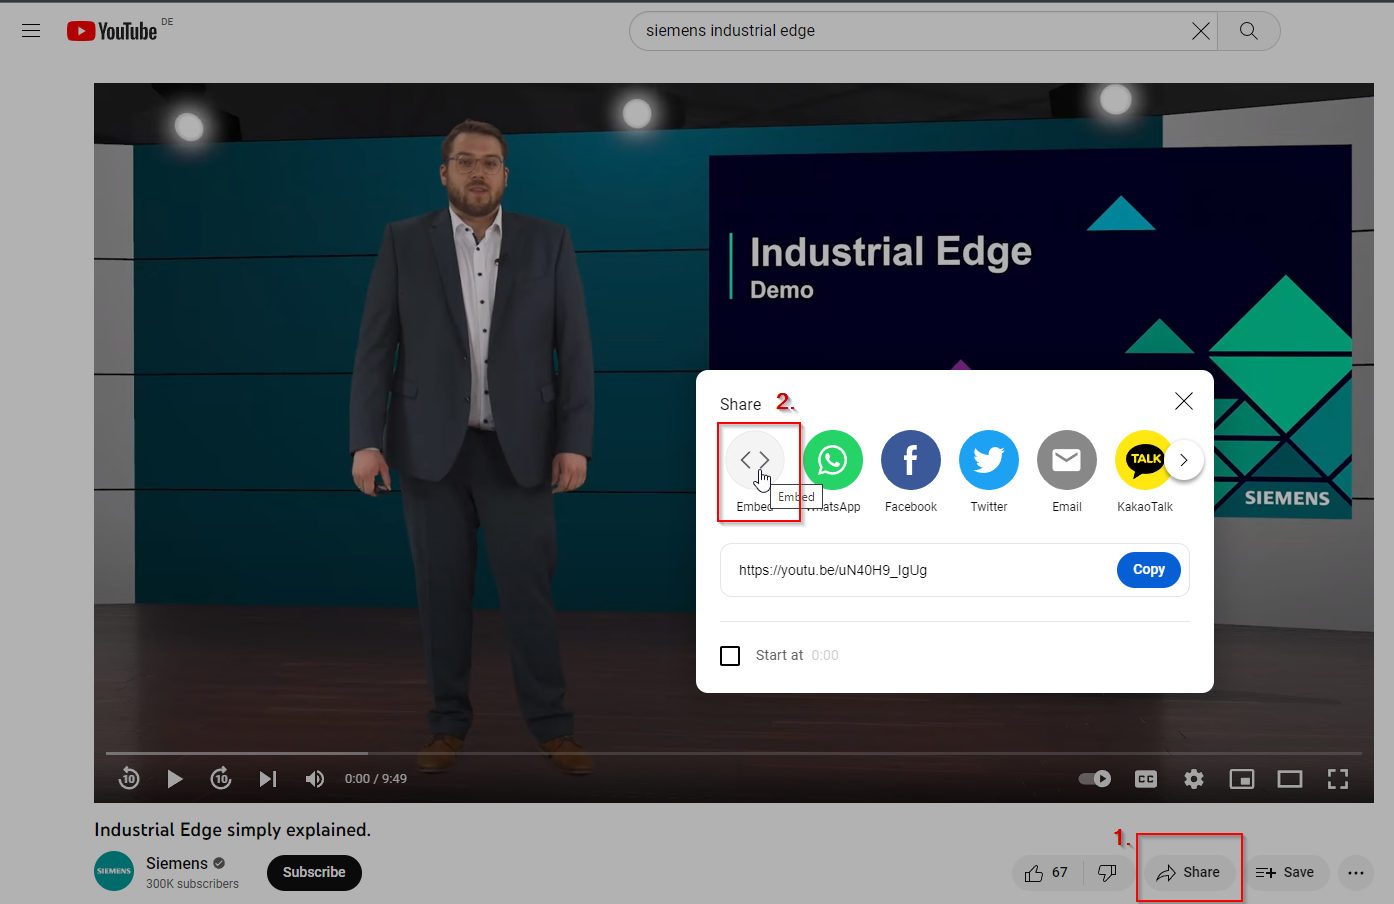
- Copy the Inframe and paste it to your markdown page

- Done
Markdown code
<iframe
width="560"
height="315"
src="https://www.youtube-nocookie.com/embed/uN40H9_IgUg"
title="YouTube video player"
frameborder="0"
allow="accelerometer; autoplay; clipboard-write; encrypted-media; gyroscope; picture-in-picture; web-share" allowfullscreen>
</iframe>
Code snippets
To display short code snippet, that are just one command, or to reference a program, you can set a ` before and after the command.
For example:
Add the theme package to your project's dependencies and install it via your favorite Python package manager (pip, poetry etc).
Markdown code
Add the theme package to your project's dependencies and install it via your favorite Python package manager (`pip`, `poetry` etc).
To write longer or more detailed snippets of code, it is often better to place them inside a code block. Code blocks allow you to use multiple lines, and markdown will render it inside its own box and with code type font.
To achieve this, start your block with a line of three backticks "```". This signals to markdown that you are creating a code block. You will need to finish with another line of three backticks. If you have more than one version of a code snippet, you can sort them into a tab, which is defined by "=== 'Title'".
For example:
markdown_extensions:
    - pymdownx.superfences:
        custom_fences:
        - name: mermaid
            class: mermaid
            format: !!python/name:pymdownx.superfences.fence_div_format

extra_javascript:
    - https://cdn.siemens-web.com/js/mermaid/8.12.0/mermaid.min.js
markdown_extensions:
    - pymdownx.superfences:
        custom_fences:
        - name: mermaid
            class: mermaid
            format: !!python/name:pymdownx.superfences.fence_code_format
Markdown code
=== "3.x"

    ```yaml title="mkdocs.yml"
    markdown_extensions:
        - pymdownx.superfences:
            custom_fences:
            - name: mermaid
                class: mermaid
                format: !!python/name:pymdownx.superfences.fence_div_format

    extra_javascript:
        - https://cdn.siemens-web.com/js/mermaid/8.12.0/mermaid.min.js
    ```

=== "4.x"

    ```yaml title="mkdocs.yml"
    markdown_extensions:
        - pymdownx.superfences:
            custom_fences:
            - name: mermaid
                class: mermaid
                format: !!python/name:pymdownx.superfences.fence_code_format
    ```
Notes
Use notes only for important alerts, e.g. for saving a recovery key. Notes, recommendations, annotations are inserted as displayed.
NOTICE
This is the header of the Note does not necessarily get used This is an example note. Doesn't this look nice?
Markdown code
!!! Note "This is the header of the Note, if this is empty, a plain 'Note' is displayed."
    This is an example note.
    Doesn't this look nice.
Inline-Blocks
Admonitions can also be rendered as inline blocks (e.g., for sidebars), placing them to the right using the inline + end modifiers, or to the left using only the inline modifier:
Inline-Blocks are the most eye catching way to achieve alert with readers. Use them on purpose for
- Hint
Example Hint-Block
This is an example hint
Markdown code
???+ Hint "Example Hint-Block"
    This is an example hint
- References
Example References-Block
This is an example references
Markdown code
???+ abstract "Example References-Block"
    This is an example references
- Warning
Example Warning-Block
This is an example warning
Markdown code
???+ warning "Example Warning-Block"
    This is an example warning
- Alerts
Example Alert-Block
This is an example alert
Markdown code
???+ danger "Example Alert-Block"
    This is an example alert
More information on how to use inline-blocks in Markdown
Tables
To add a table, use three or more hyphens (---) to create each column’s header, and use pipes (|) to separate each column. For compatibility, you should also add a pipe on either end of the row.
Example:
| Title | Description |
|---|---|
| Example 1 | Info 1 |
| Example 2 | Info 2 |
Markdown code
| Title | Description |
| --- | --- |
| Example 1 | Info 1 |
| Example 2 | Info 2 |
Quality check and finalization of documentation
Language check Metadata
Test Case
If one item of the following table does not suite your test discretion, you can remove the row from your test description.
| Test Title | Your test title |
|---|---|
| Test Category | Category |
| Test No. | Test No. |
| Description | Your test description |
| Pre-Conditions | Condition 1 Condition 2 Condition 3 |
| Exception Condition | Exception rules for this test |
| Warning Condition | Condition for which the test is not failed, yet the warning contidion checks |
| Failed condition | Condition for which the test is failed |
Procedure
| Steps | Action | Expected Result |
|---|---|---|
| 1. | First step you need to do | Result that you expect |
| 2. | Second step you need to do | Result that you expect |
| 3. | Third step you need to do | Result that you expect |
Markdown code
| Test Title | Your test title |
| --- | --- |
| **Test Category** | Category |
| **Test No.** |  Test No. |
| **Description** | Your test description |
| **Pre-Conditions** | Condition 1<br> Condition 2<br> Condition 3 |
| **Exception Condition** | Exception rules for this test |
| **Warning Condition** | Condition for which the test is not failed, yet the warning contidion checks |
| **Failed condition** | Condition for which the test is failed |

??? Example "Procedure"
    | Steps | Action | Expected Result |
    | --- | --- | --- |
    | 1. | First step you need to do | Result that you expect |
    | 2. | Second step you need to do | Result that you expect |
    | 3. | Third step you need to do | Result that you expect |