Environment Setup
Overview
The needed dependencies can be installed with XXXXXX (example script in textbox)
The dependencies must be installed for the debian-11.1.0-amd64-netinst.iso linux distribution with this script because some required packages are missing in debian 11 linux distributions.
Access and download the linux distribution here: debian-11.1.0-amd64-netinst.iso
Download and Install current IEDK Services
If existing IEDK reference services are to be used in the development environment, the *.deb packages of the services must be downloaded to the development environment.
Download IEDK reference services from IE Hub.
China Region
For users in China region please download from IE Hub China.
After downloading the .deb packages of the services, go to the directory in which the.deb packages are downloaded.
The *.deb packages can be installed in the development environment with the following command:
apt install ./dm-*.deb

# or the following command can be used.

# dpkg -i dm-*.deb
NOTICE
Some IEDK services include dependencies. Therefore, it is important to review outputs and install dependencies during the installation step.
NOTICE
In case developers do not want to use the edge runtime packages for IEDK development, a mock server can be installed. In that case, the development environment can be used without a real device onboarded to the IEM. The mock server acts like the IE Runtime API endpoints which are used by IEDK services. To download and install the mock servcie, the following link can be used:
Download and install mock service
In case developers want to use the edge runtime and want to onboard a development device to the IEM, dependencies of the Onboard Service can be installed to the development environment. To install these dependencies, the following link can be used:
Installing and validating onboard service dependencies
Download and Install Mock Service
To install the mock service, the desired version of the *.deb package is downloaded from here.
After downloading the .deb package, navigate to the directory in which the.deb package was downloaded and run the following command to install the *.deb package:
apt install ./iert-mock-server_*_linux_amd64.deb
Detailed Information about Mock Service
The mock service is prepared for the endpoints in which the Onboard Service communicates with the edge-iot-core container.
Endpoint:
| Method | Path |
|---|---|
| GET | /device/edge/b.service/api/v1 |
This endpoint informs the client whether the Edge Device is onboarded or not. If the client wants to, the client can add a parameter as a query string when calling the above endpoint. This parameter is IsOnboardedStatusCode.
Example: https://{IP_ADDRESS}/device/edge/b.service/api/v1?IsOnboardedStatusCode=200
With this parameter, the client sends a value to the endpoint. The endpoint receives this value and can send it back to the client. In this way, a dynamic structure is created.
Status codes 503, 531 and 200-400 are defined. If a status code other than this definition is sent to the endpoint, the endpoint will not be able to define this status code. It will return the Edge Device's last status code to the client.
In addition, it can send requests directly to /device/edge/b.service/api/v1 device without providing any parameters. In this case, no matter what the last status code of the Edge Device is, that status code will be sent to the client.
| Method | Path |
|---|---|
| POST | /device/edge/b.service/api/v1/activate |
When sending the POST request, it should be sent as displayed in the figure below:
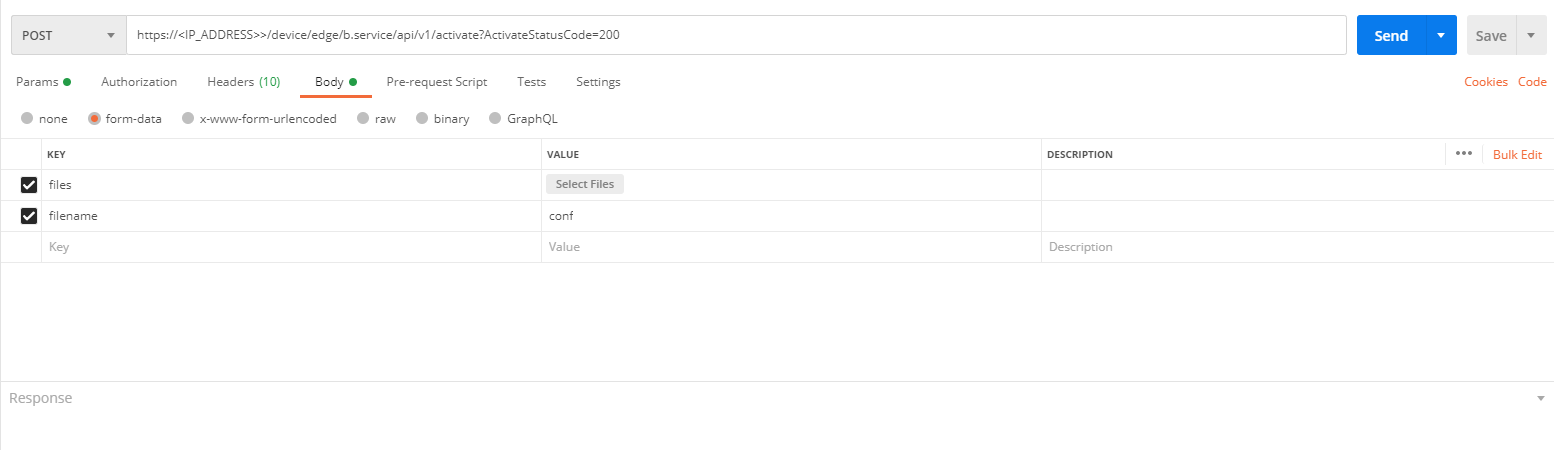
NOTICE
The device-XXX configuration file should be used to onboard the Egde Device.
This endpoint device is used to be onboarded. If the client wants to, the client can add a parameter as a query string when calling the above endpoint. This parameter is ActivateStatusCode.
Example: https://{IP_ADDRESS}/device/edge/b.service/api/v1/activate?ActivateStatusCode=200
-
If this parameter is at the end of the endpoint and if a status code in the range 200-400 is sent, the Edge Device will be onboarded. If the Edge Device is onboarded, the IsOnboarded endpoint is called to be onboarded. Then, if the IsOnboarded endpoint is called by the clients, the information, that the Edge Device is onboarded, is sent to the clients.
-
If this parameter is at the end of the endpoint and if a status code in the range 400-500 is sent, the Edge Device will not be onboarded. The client error and status code will be sent to the client.
-
If this parameter is at the end of the endpoint and if a status code in the range 500-512 is sent, the Edge Device will not be onboarded. The server error and status code will be sent to the client.
-
If this parameter is at the end of the endpoint and if a status code is sent in an undefined range, the Edge Device will not be onboarded. The error and status code will be sent to the client.
-
If this parameter is missing at the end of the endpoint, the Edge Device will be directly onboarded. If the Edge Device is onboarded, the IsOnboarded endpoint is called to be onboarded. If the IsOnboarded endpoint is called later by the clients, the information, that the Edge Device is onboarded, is sent to the clients.
With this parameter, the client sends a value to the endpoint. The endpoint receives this value and can send it back to the client with the respective message. In this way, a dynamic structure is created.
| Method | Path |
|---|---|
| POST | /device/edge/b.service/api/device/configfile |
| GET | /device/edge/b.service/api/device/configfile |
Example: https://{IP_ADDRESS}/device/edge/b.service/api/v1/configfile
If this endpoint was called before the Edge Device was onboarded, it will return an empty response as JSON. This information is sent to the client.
A POST request in the json format is sent to this endpoint after the Edge Device is onboarded. The json response is saved in a file. If this endpoint is called later with the GET request, the json formatted data is read from the file and sent to the client.
Download and install IEDK CLI tool
If existing IEDK services are being used or if you want to write your own custom services from existing proto files, an auxiliary tool is available for these services and methods. The documentation of this tool can be accessed here.
Download Script
Download the script for setting up the development environment
After running this script, some components will be installed in the development environment. Before running this script, you can examine these components in the script with the help of comment lines.
With this script, the go1.17.3 version will be installed. The download page can be checked to upgrade. The latest version can be selected via this link. Then, the line "wget https://golang.org/dl/go1.17.3.linux-amd64.tar.gz" should be edited in the script.
NOTICE
Changes can be made in the script as desired. The script is supplemented with comment lines.
After downloading the script, go to the directory in which the script is located to run it. Then the commands below must be run.
chmod u+x devenvironment.sh
bash devenvironment.sh
Check of the Development Environment
Ntp.proto file can be accessed after the installation of the Device Kit API .deb package.
Go to the directory in which the Ntp.proto file is located. The below command should run successfully in the directory in which the Ntp.proto file is located and then the .pb.go file will be created in the same directory. The .pb.go file can be created with this command whenever any changes are made to the Ntp.proto file.
protoc --go_out=plugins=grpc:. Ntp.proto
NOTICE
The development environment is ready to develop services with the go programming language and grpc.
Suggestion for IDE
If an IDE is needed, Visual Studio Code can be installed in the development environment.
Visual Studio Code can be installed via this link:
-
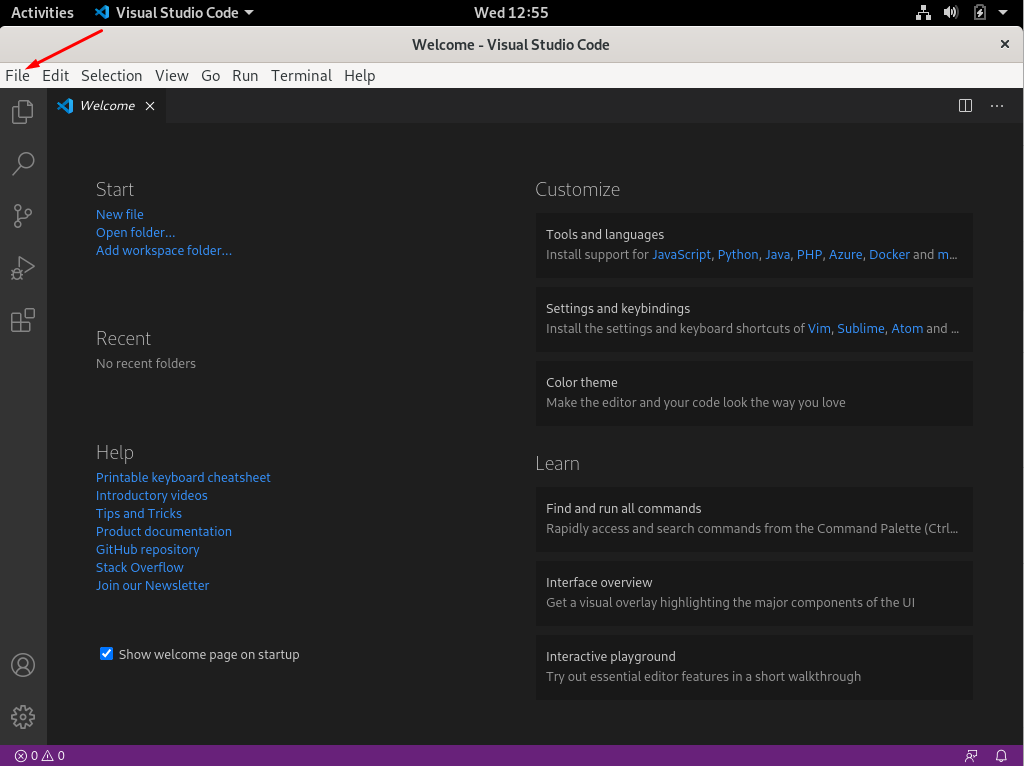
Open Visual Studio Code.
-
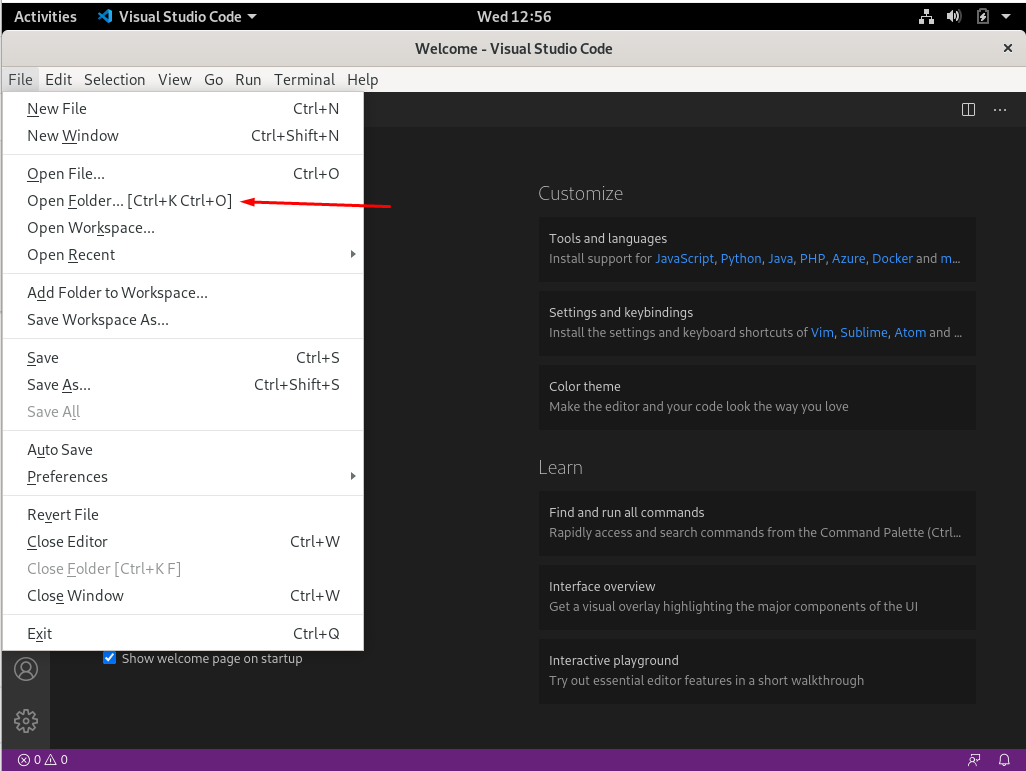
Click on the file section.
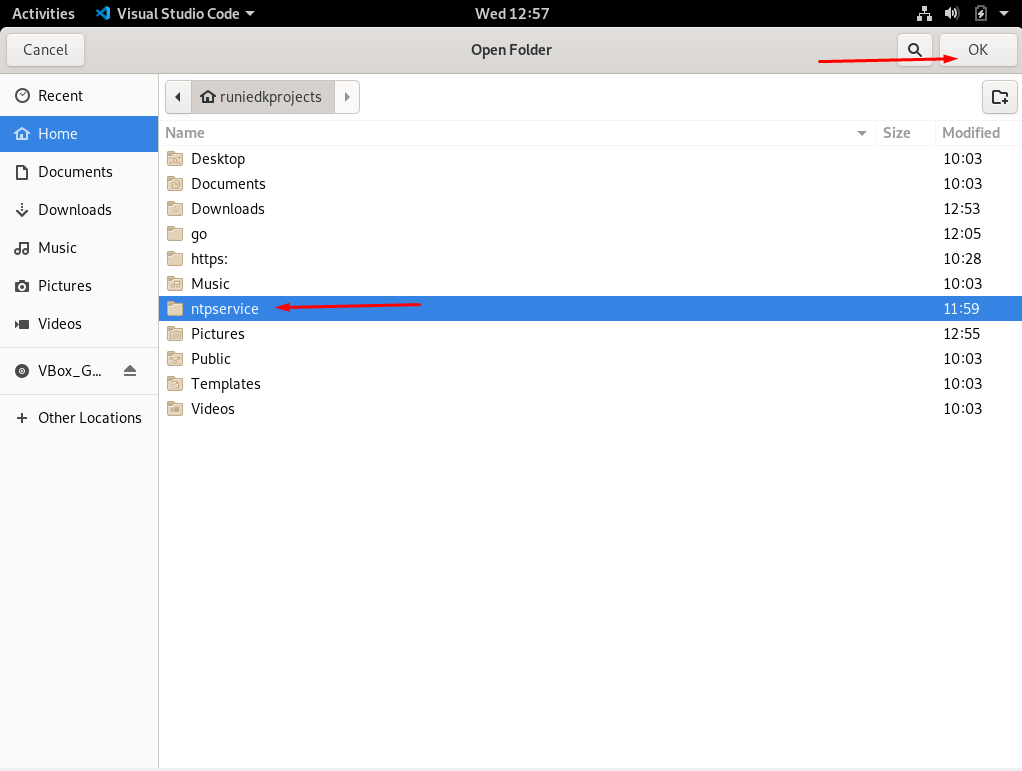
- Select the cloned NTP service file from the relevant directory.
- After selecting the NTP service, click the ntpservice.go file and install the Go extension. The IDE will understand this file as a Go file.
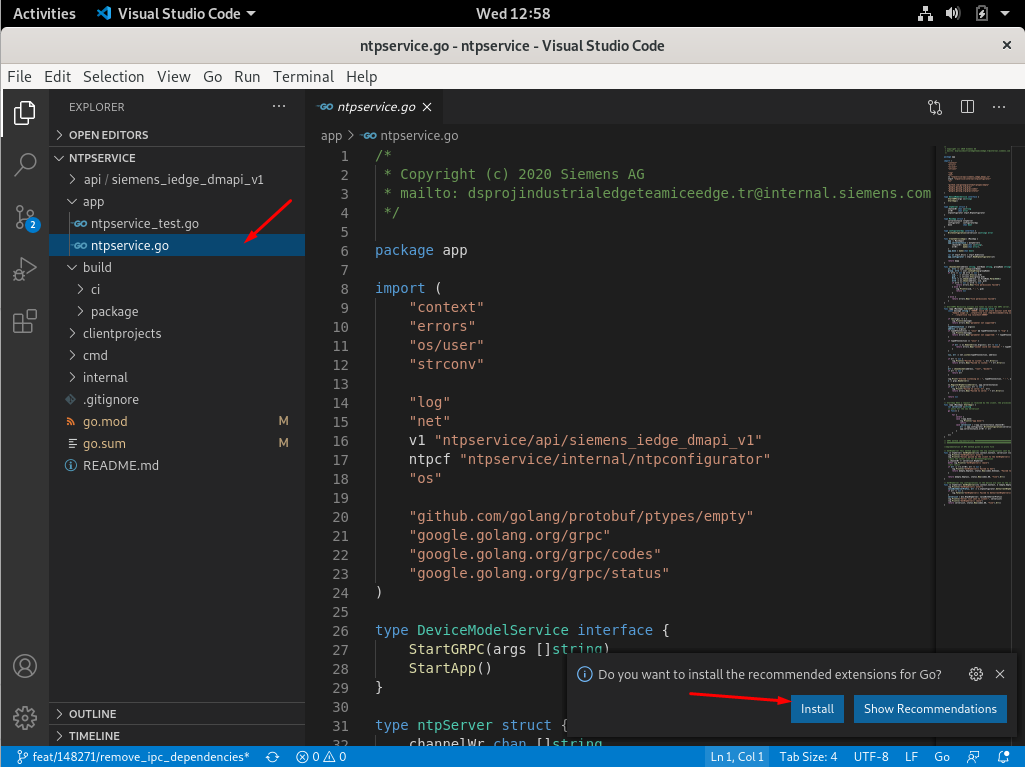
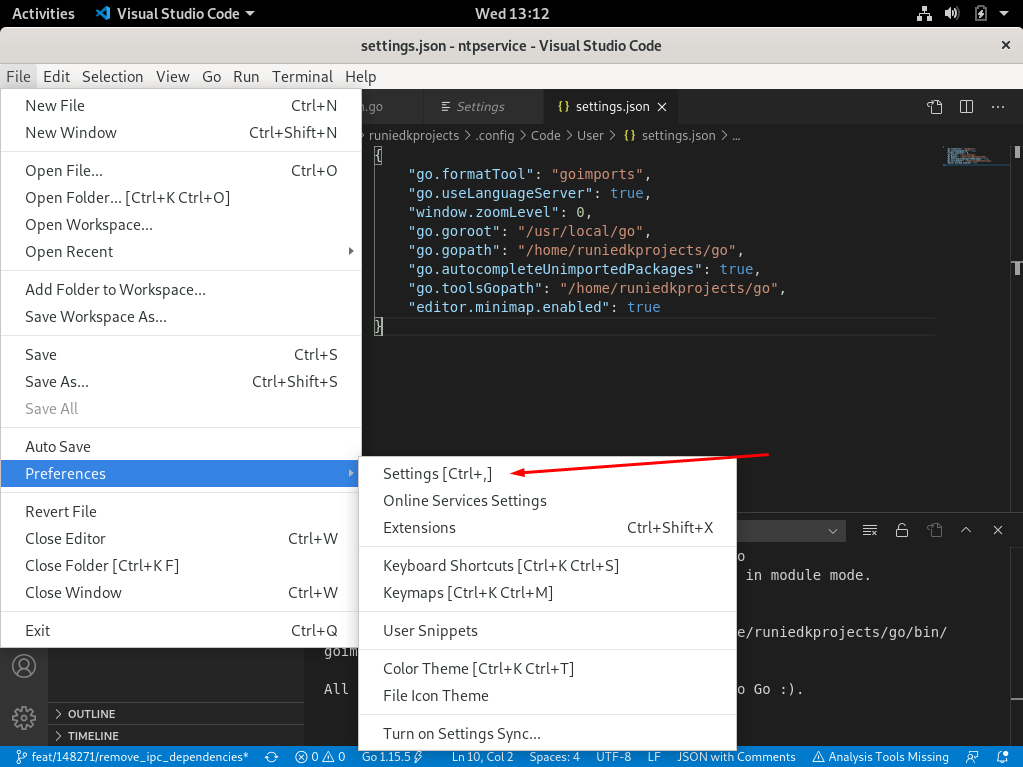
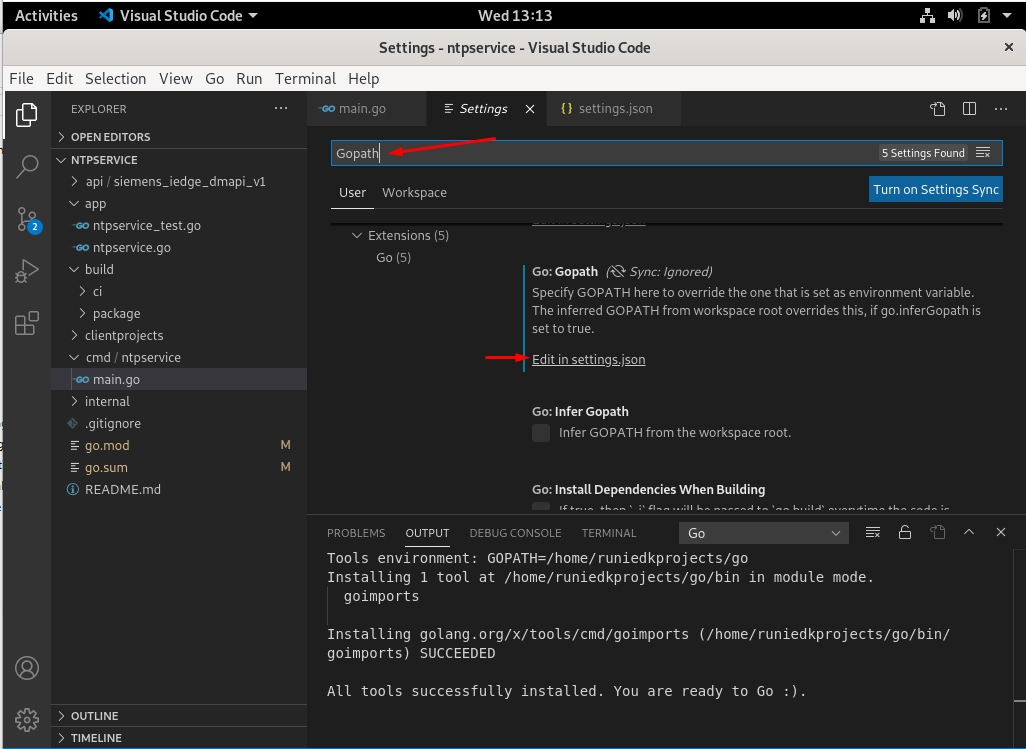
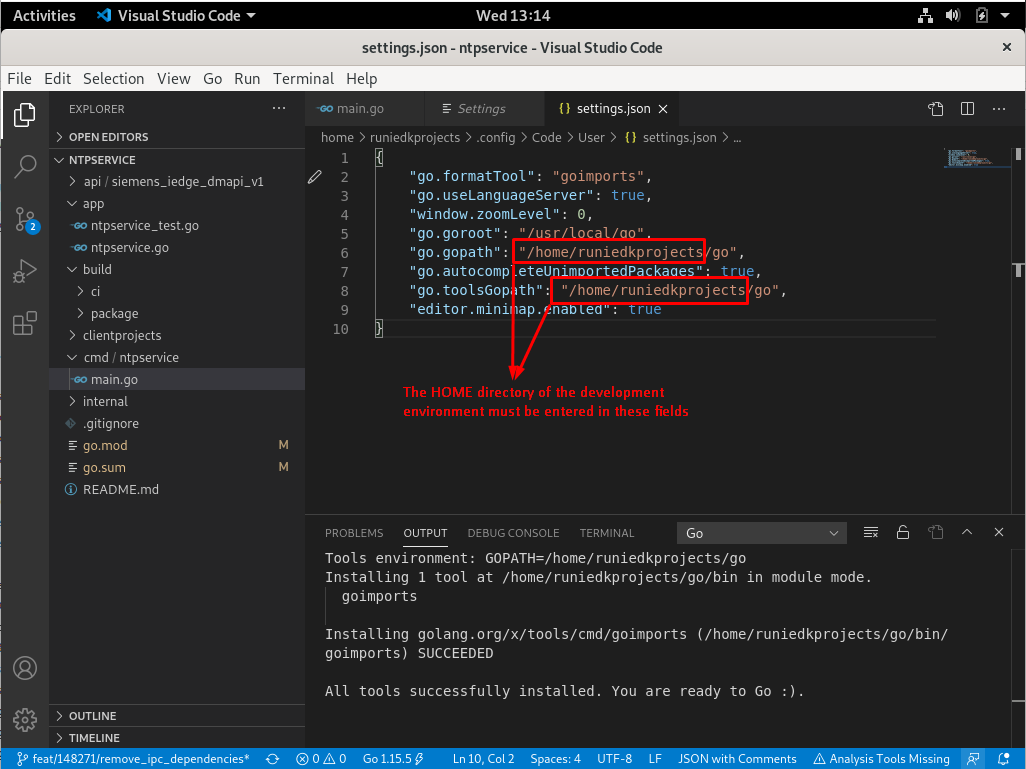
- Follow the figures below to configure GOPATH, GOROOT and Go settings.
Visual Studio Code is ready to develop services with the Go programming language and gRPC. Other Industrial Edge Device Kit services can also be run in this way. Also, different services can be easily developed in this development environment.