Platform settings
Navigate to the Industrial Edge Management Settings page to access platform settings.
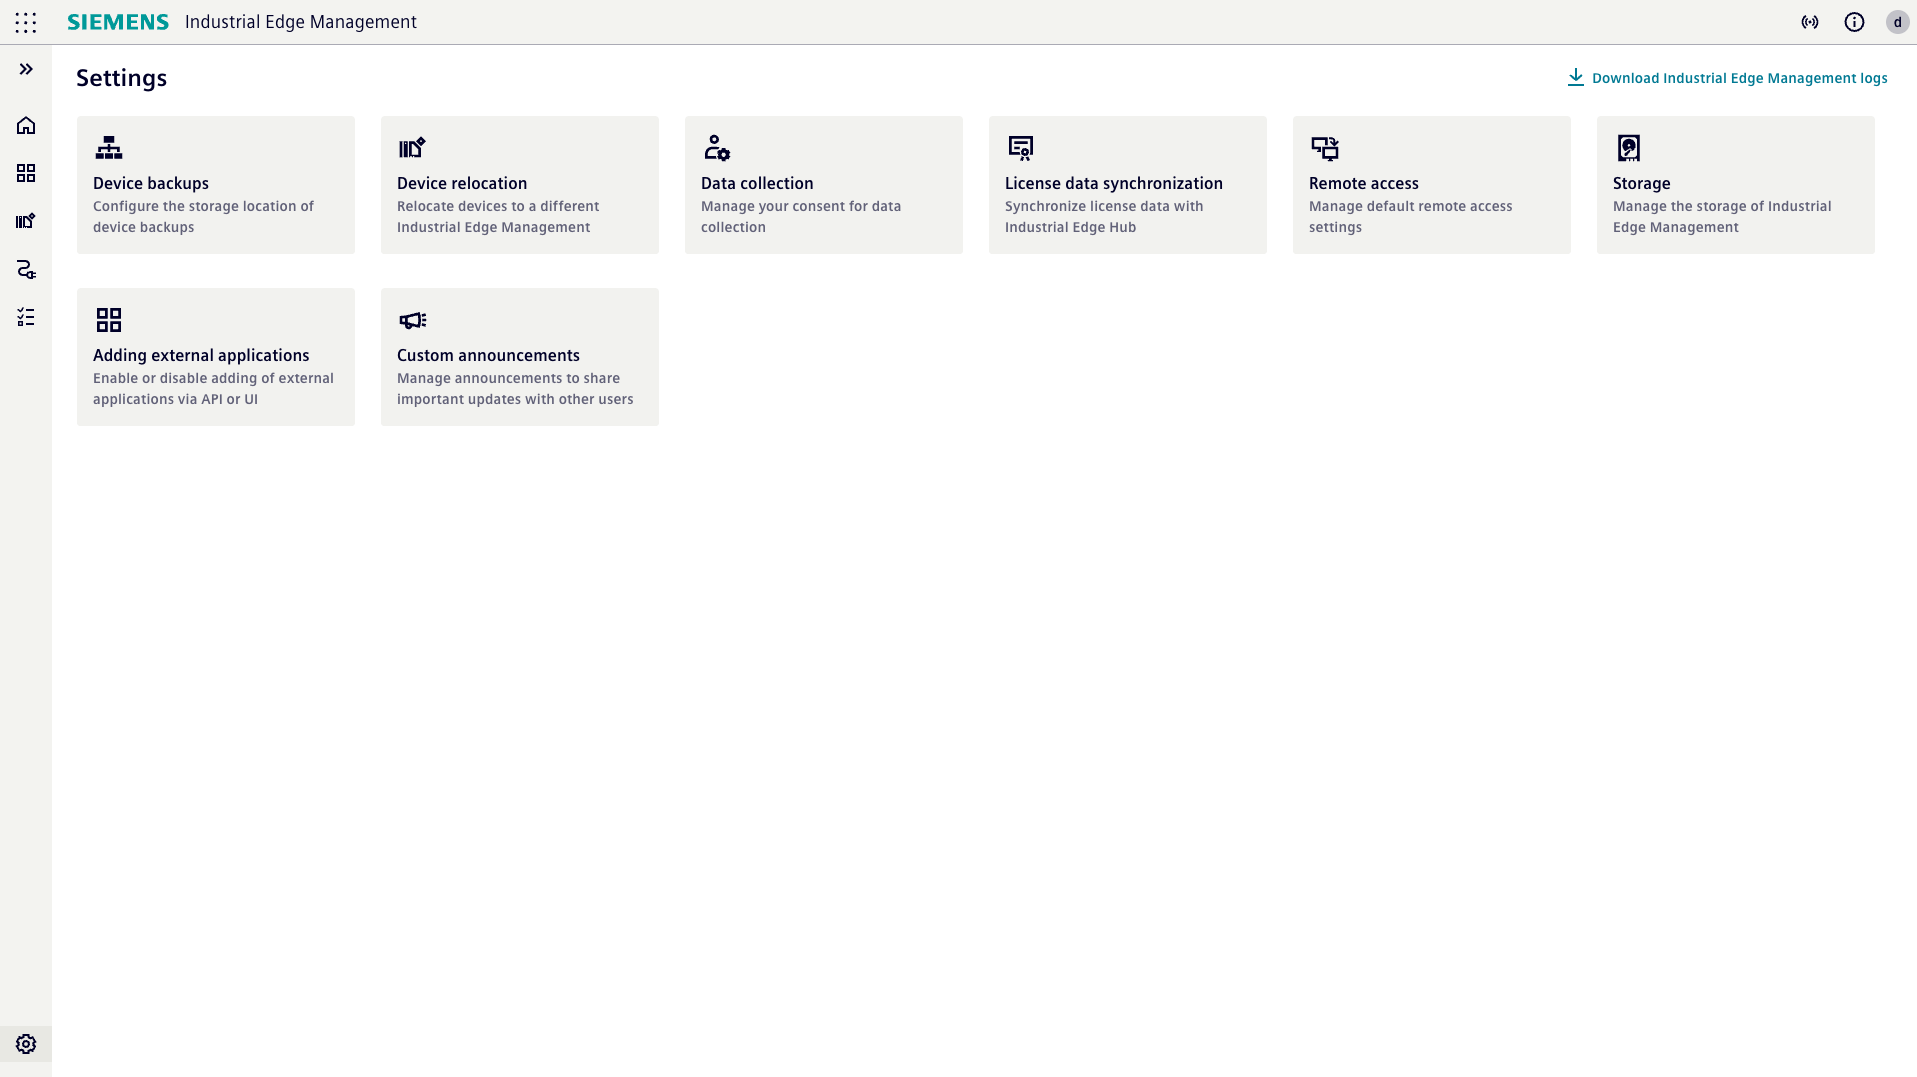
Device backup storage location
The detailed description on how to manage the storage location can be found in Configuration of backup storage.
Device relocation
In this section, devices from an Industrial Edge Management OS (IEM OS) can be imported. This procedure is subject to various prerequisites described in Relocating Edge Devices.
Data collection
Modifying data collection consent
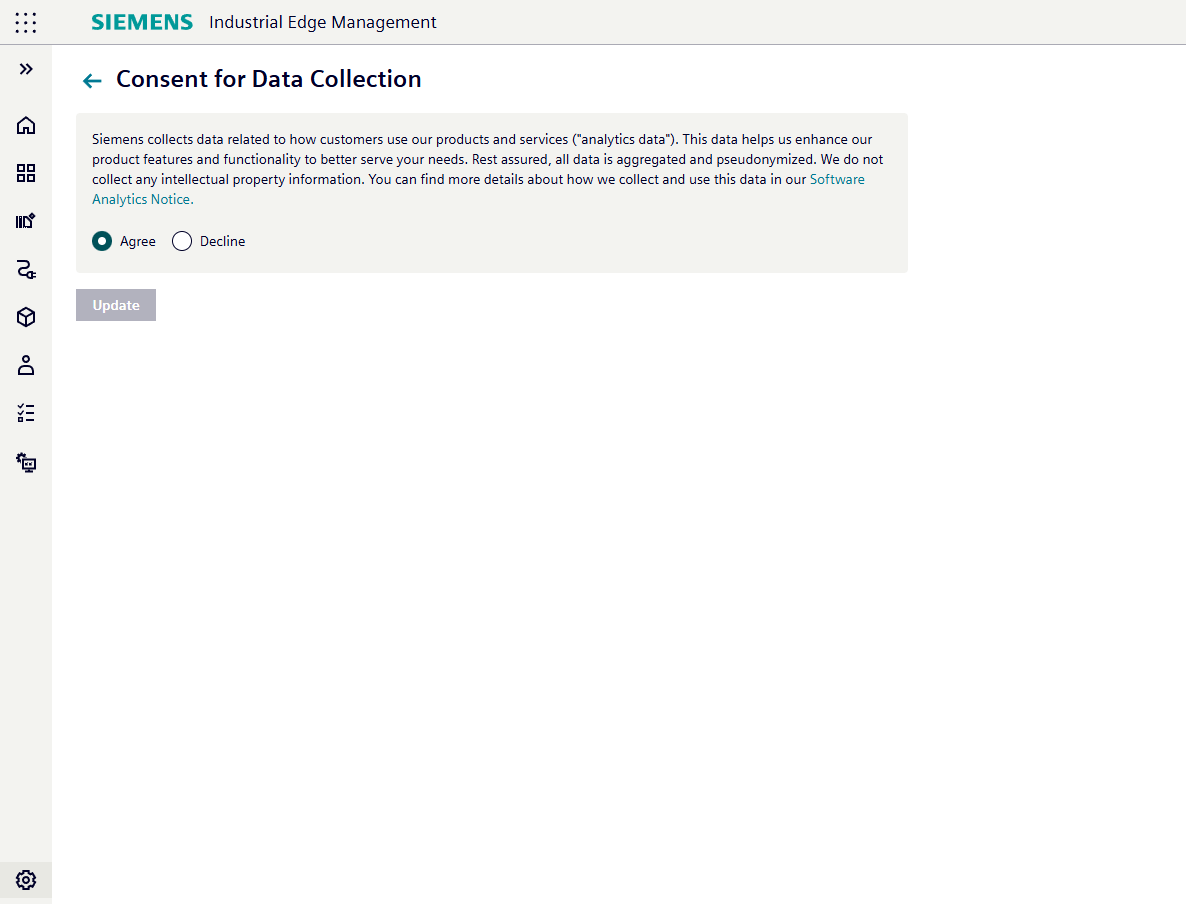
Upon the first login to the Industrial Edge Management, the admin will be presented with a data collection consent prompt. This preference can be modified at any time thereafter.
-
To view or modify the data collection consent preference navigate to the
Settingspage. -
Click on
Data collectionto access your consent settings:- To opt in to optional data collection, select the
Agreeradio button and clickUpdate - To opt out of optional data collection, select the
Declineradio button and clickUpdate
- To opt in to optional data collection, select the
Download Industrial Edge Management logs
Should the system appear to be malfunctioning, you can download the compressed IEM logs from link in the top right corner. This will greatly assist Siemens Support with their further troubleshooting efforts.
Remote Access
Expiration Time
This section allows you to configure the default expiration time for device connection sessions. The expiration time setting affects new connections established with remote devices.
Terminate all remote connections
This section displays the current number of active remote device connections and provides the option to terminate all active connections.
Terminating all active connections
-
On the
Settingspage, click onRemote accessto access the option to terminate all active connections: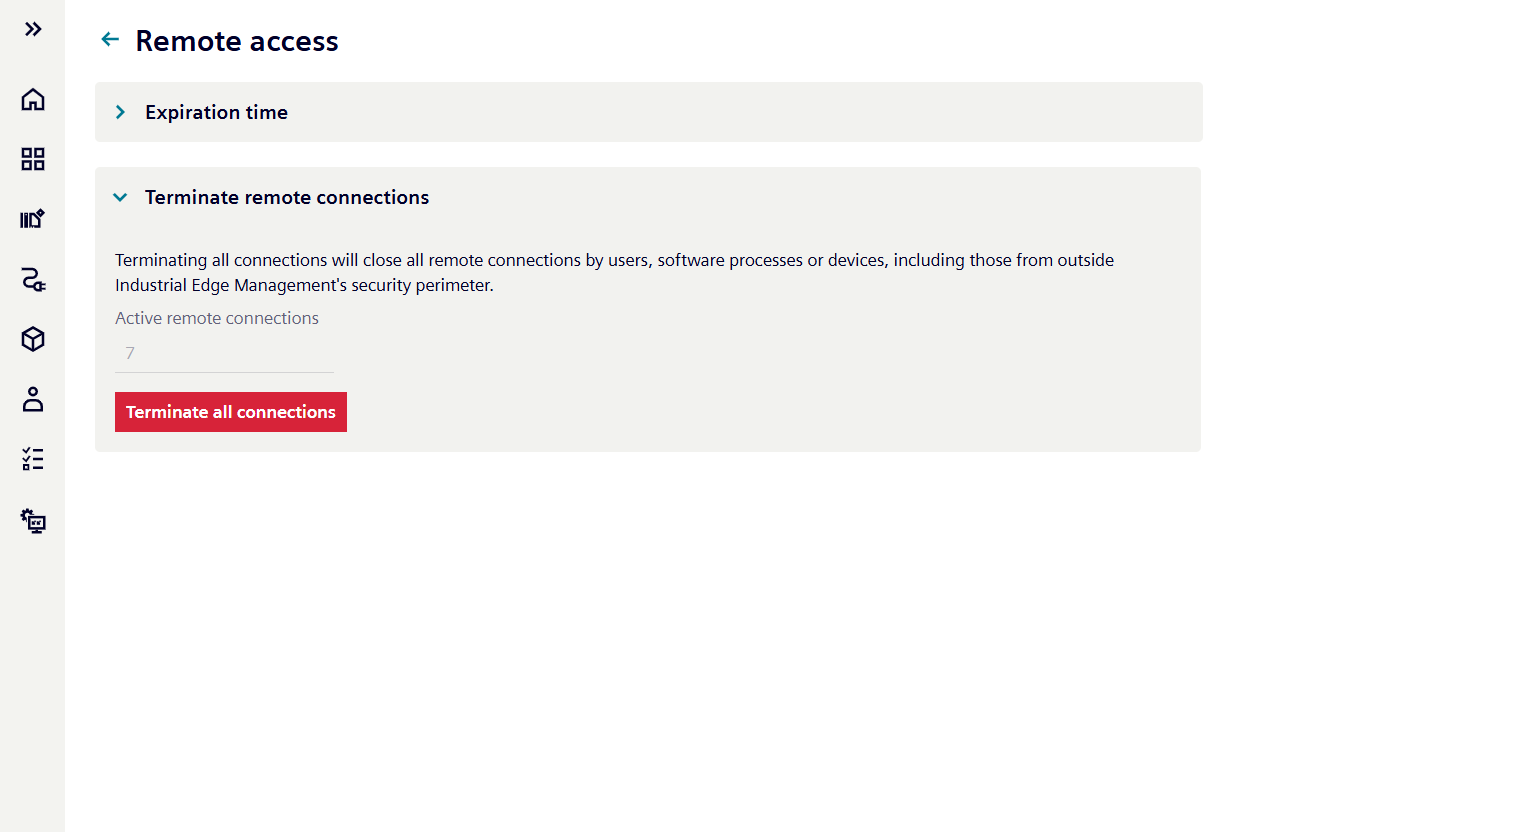
-
Click on
Terminate all connectionsto initiate the termination process for all active remote connections.
Termination Process
The termination process occurs gradually, with connections being closed sequentially.
NOTICE
- The process continues until all connections that were present at the time of initiating the termination have been closed.
- Terminating an active connection with unsaved changes may result in the loss of configuration data.
Storage
The Storage menu provides the capability to manage the storage of firmware artifacts.
Firmware storage management is not available in the IEM Cloud offering, as the firmware image repository is centrally managed within the cloud infrastructure.
On the Settings page, click on Storage to access the storage menu.
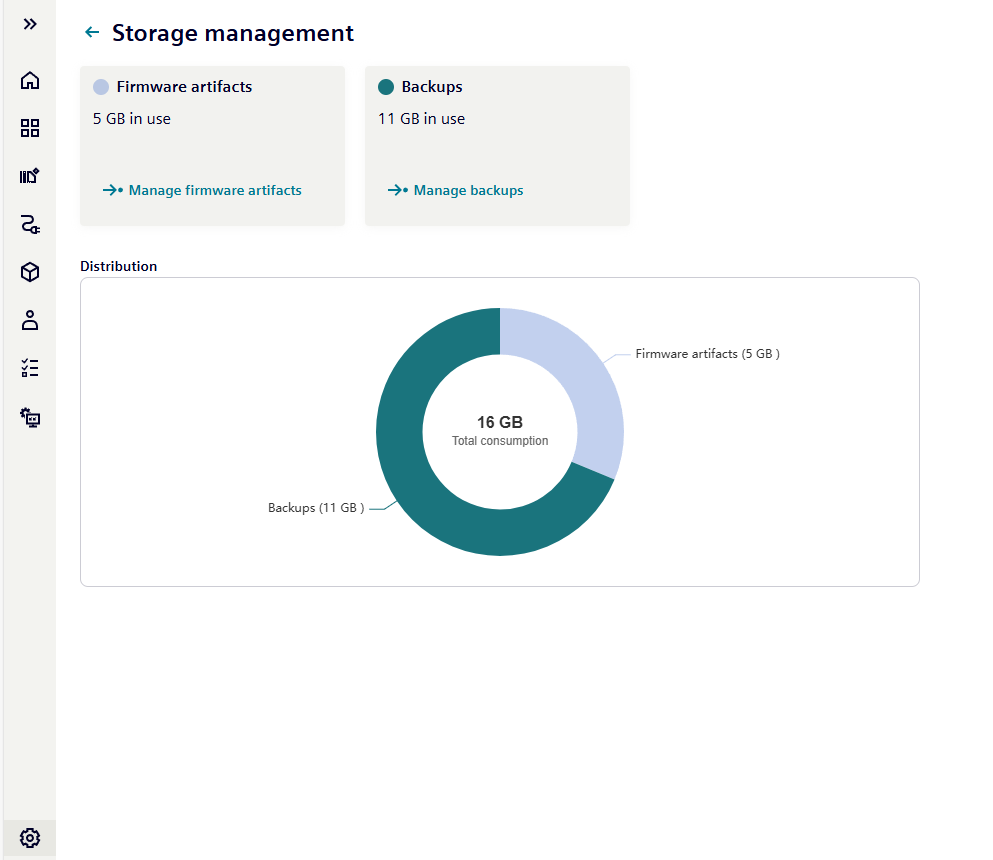
A detailed description for the Storage management can be found in Storage Overview.
Modifying expiration time
On the Settings page, click on Remote access to access your Expiration Time settings:
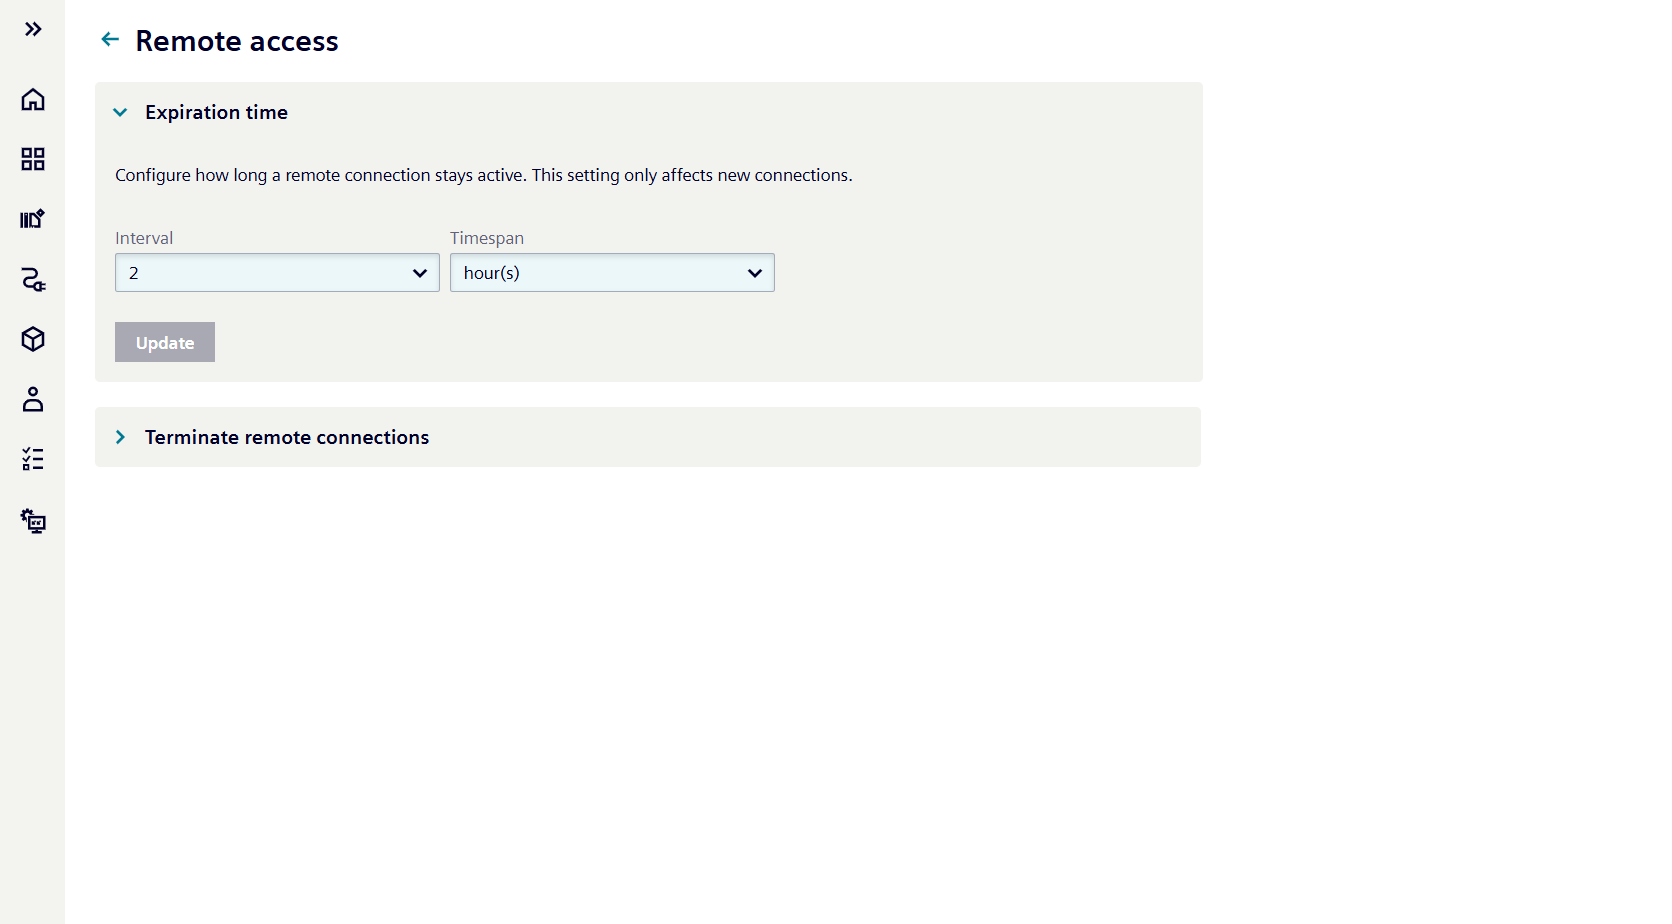
To modify the expiration time:
- Select the desired time unit from the first dropdown menu
- Choose the specific duration from the second dropdown menu
- Click the "Update" button to apply the changes
Available time intervals:
- Hours: 1 to 23
- Days: 1 to 6
- Weeks: 1 to 4
Custom Announcements
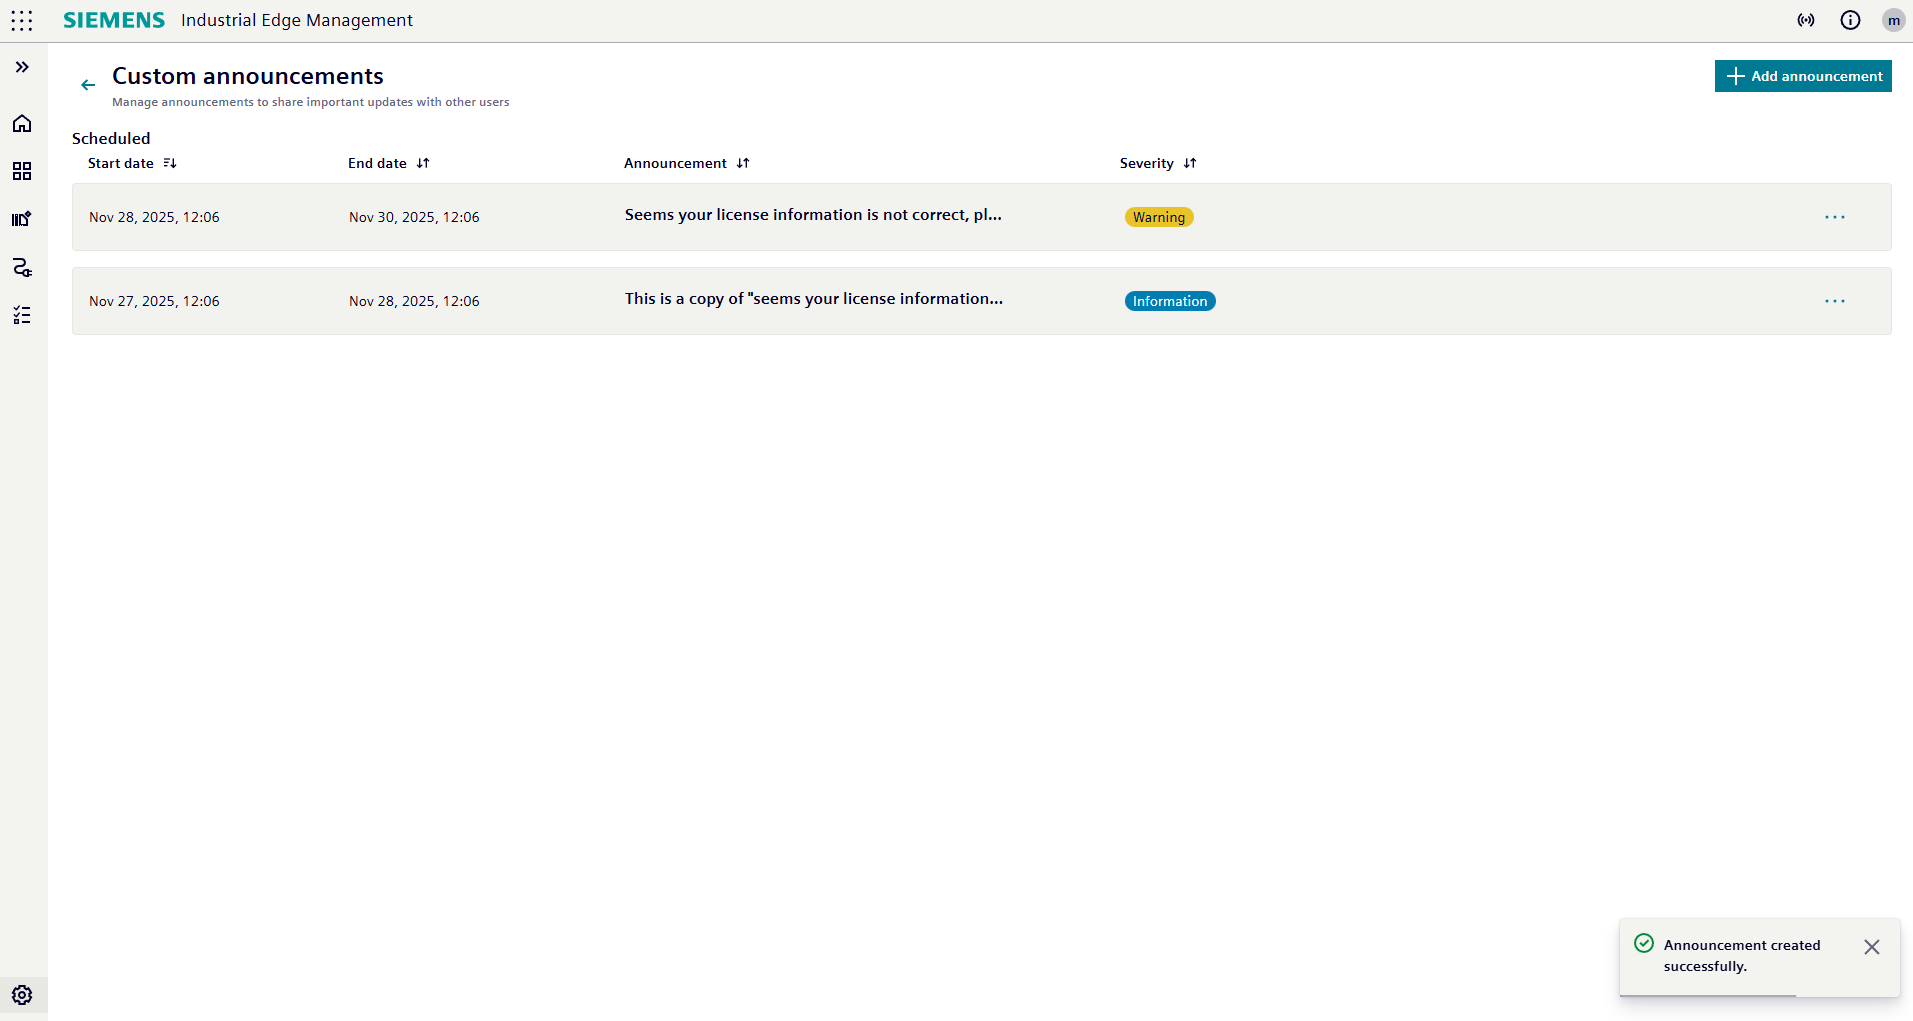
Through the Custom Announcements section, administrators can create and manage custom announcements that will be displayed to users upon login.
Accessing Custom Announcements
-
On the
Settingspage, click onCustom announcementsto access the list of existing announcements and manage them: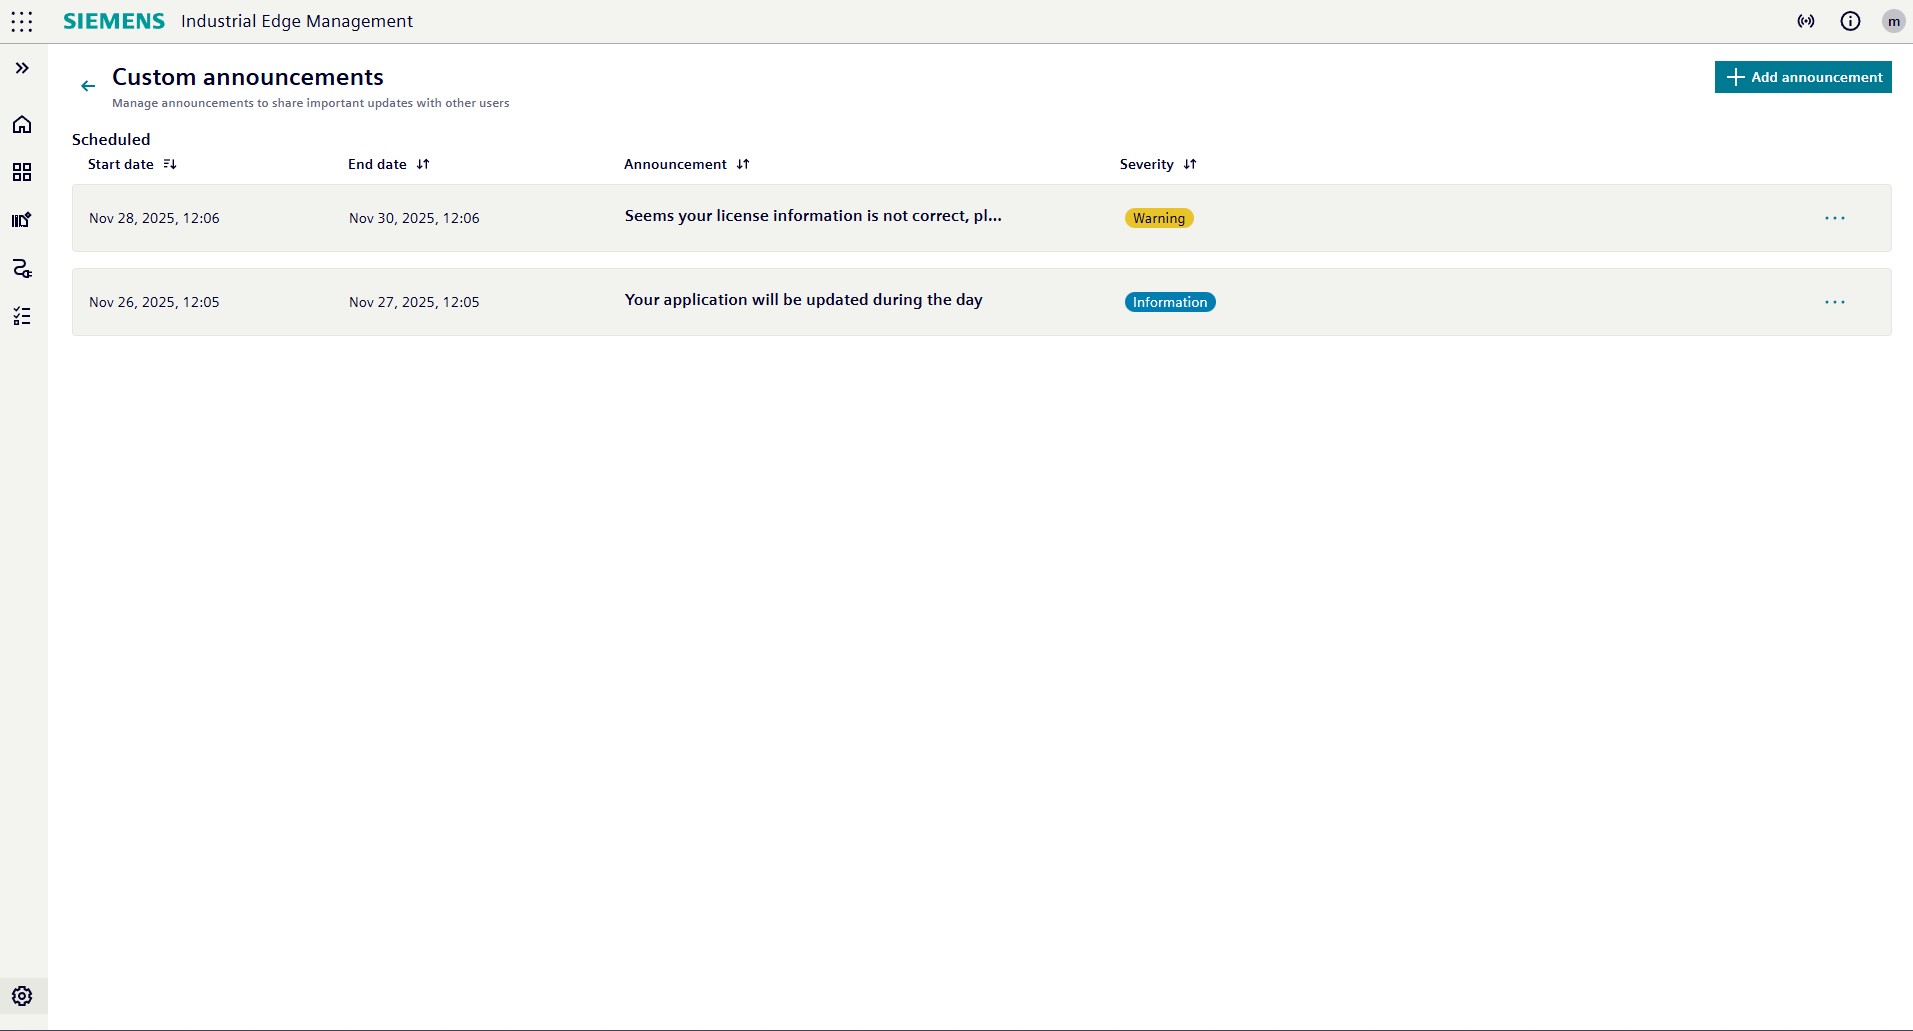
-
Click on
Terminate all connectionsto initiate the termination process for all active remote connections.
Create a Custom Announcement
- Click on
Add announcementto access the form creation page:
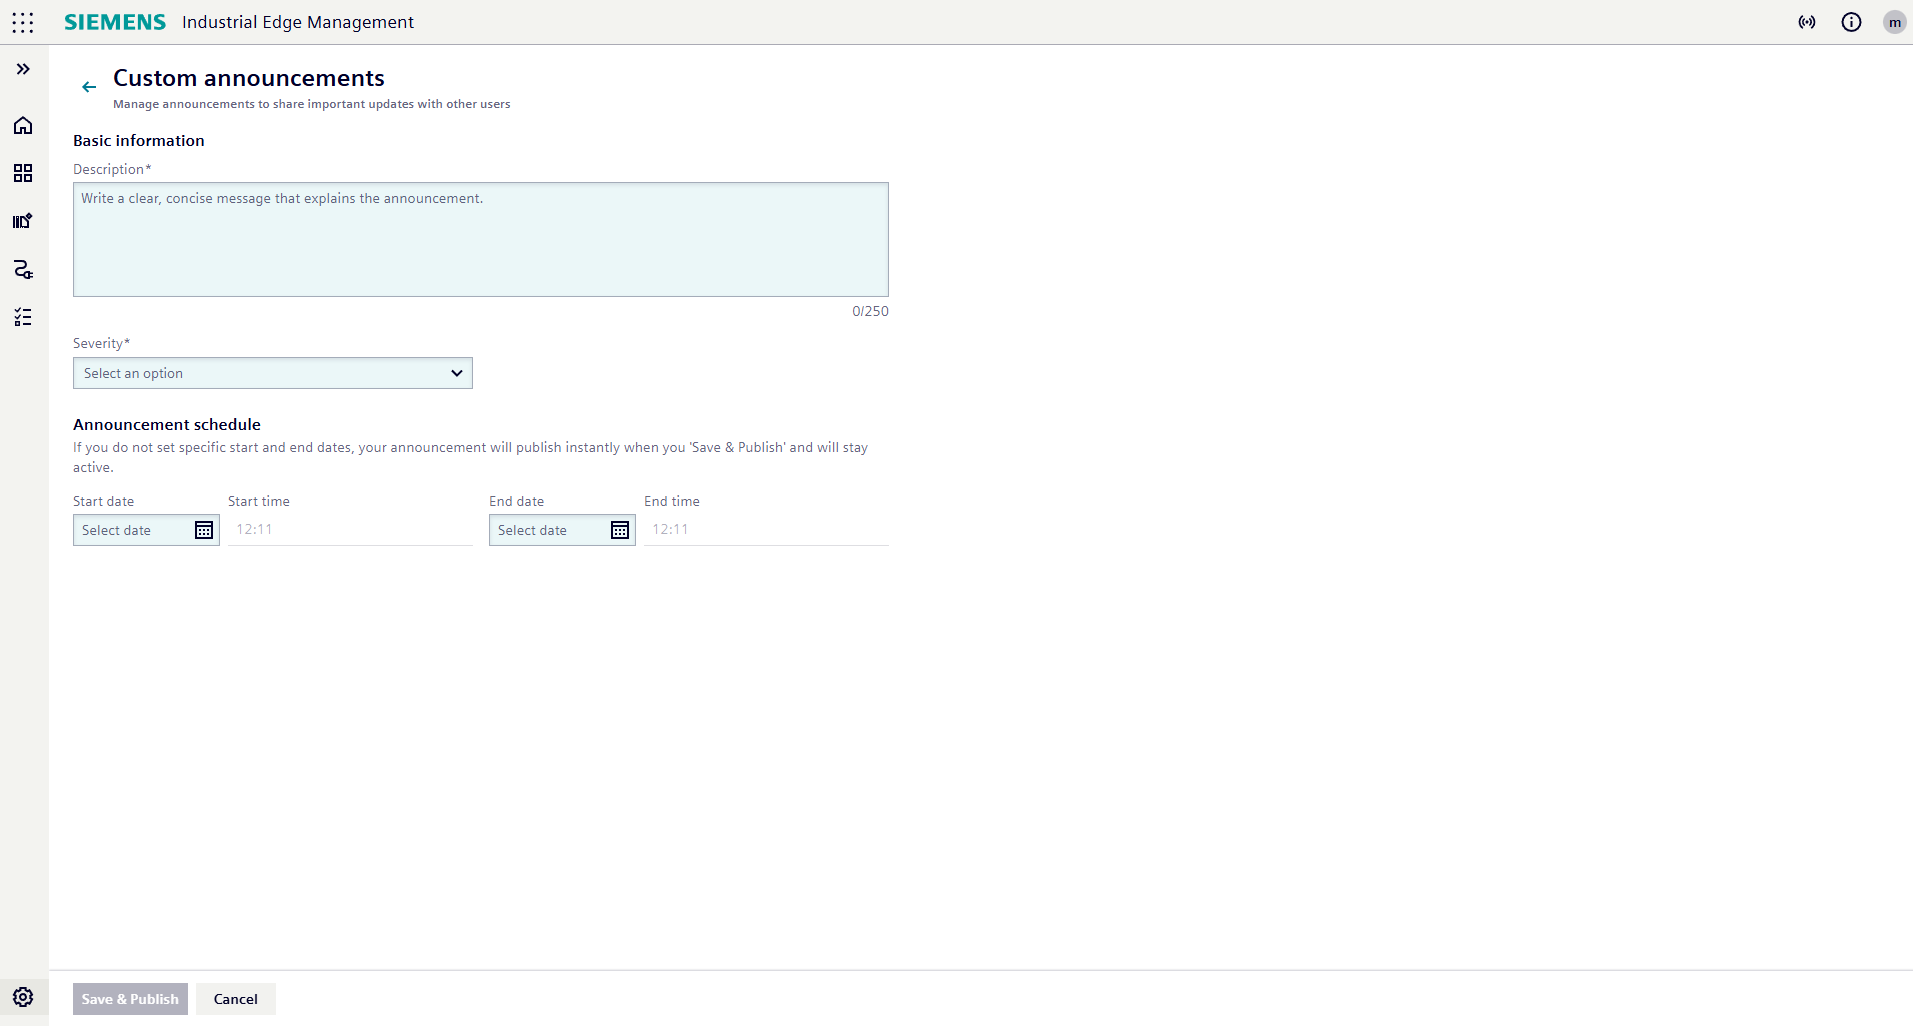
- Fill in the required fields:
- Description: Enter the content of the announcement
- Severity: Select the severity level (Info, Warning, or Critical)
- Announcement Schedule: Define the start and end date/time for the announcement visibility
- Click on
Save & Publishto save the announcement and make it visible to users upon login if the time slot is within current time. - The newly created announcement will now appear in the list of announcements.
- If click on
Cancel, the announcement will not be saved, and you will be redirected back to the list of announcements.
NOTICE
- A limit of 10 active announcements can be created at any given time.
- Onle one announcement can be created within a time slot.
- Announcements with "Info" severity will be displayed with a blue background, "Warning" with yellow, and "Critical" with red.
- All the active announcements will be displayed to users before login in the order of severity (Critical, Warning, Info) and then by start date/time (earliest first).
Edit a Custom Announcement
- In the list of announcements, locate the announcement you wish to edit.
- Click on the announcement to access the edit form page:
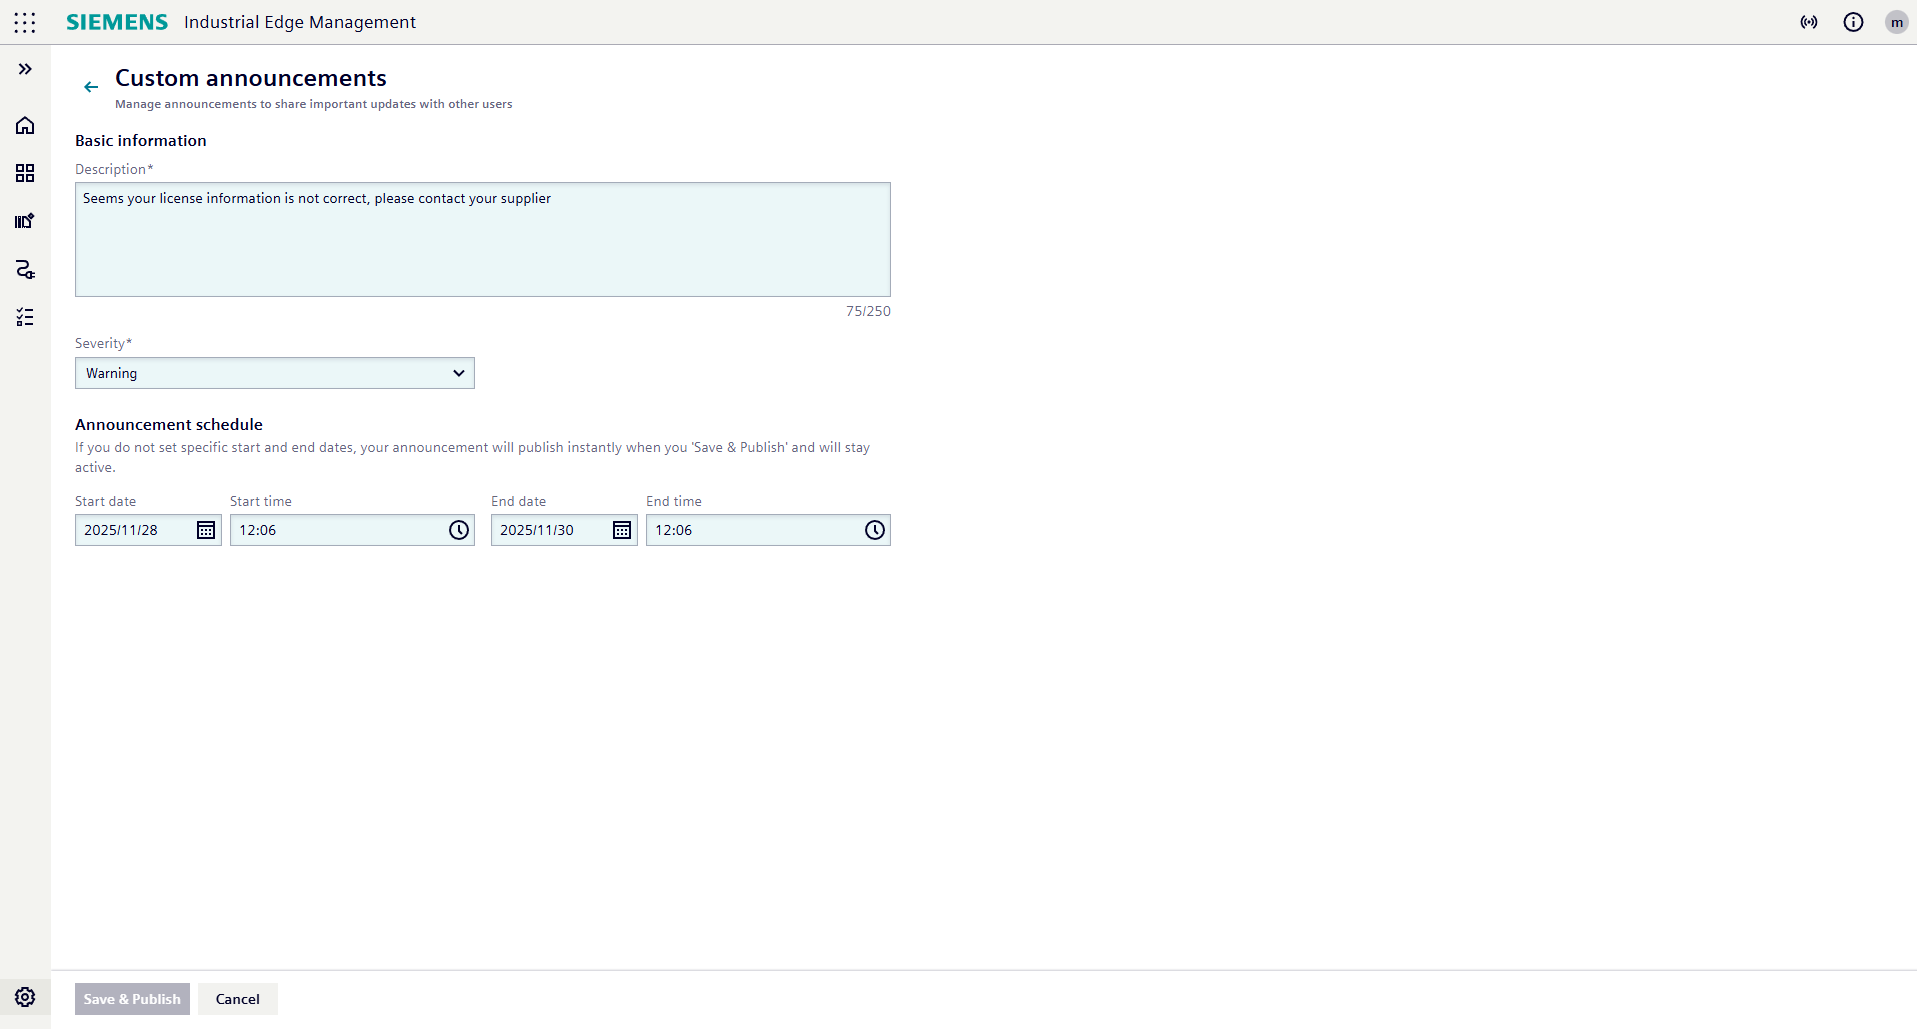
- Modify the desired fields:
- Description: Modify the content of the announcement
- Severity: Select the severity level (Info, Warning, or Critical)
- Announcement Schedule: Change the start and end date/time for the announcement visibility (in this case Start date/time can be leaved as past date/time)
- Click on
Save & Publishto save the announcement and make it visible to users upon login if the time slot is within current time. - The newly modified announcement will now appear in the list of announcements.
- If click on
Cancel, the announcement will not be changed, and you will be redirected back to the list of announcements.
Delete a Custom Announcement
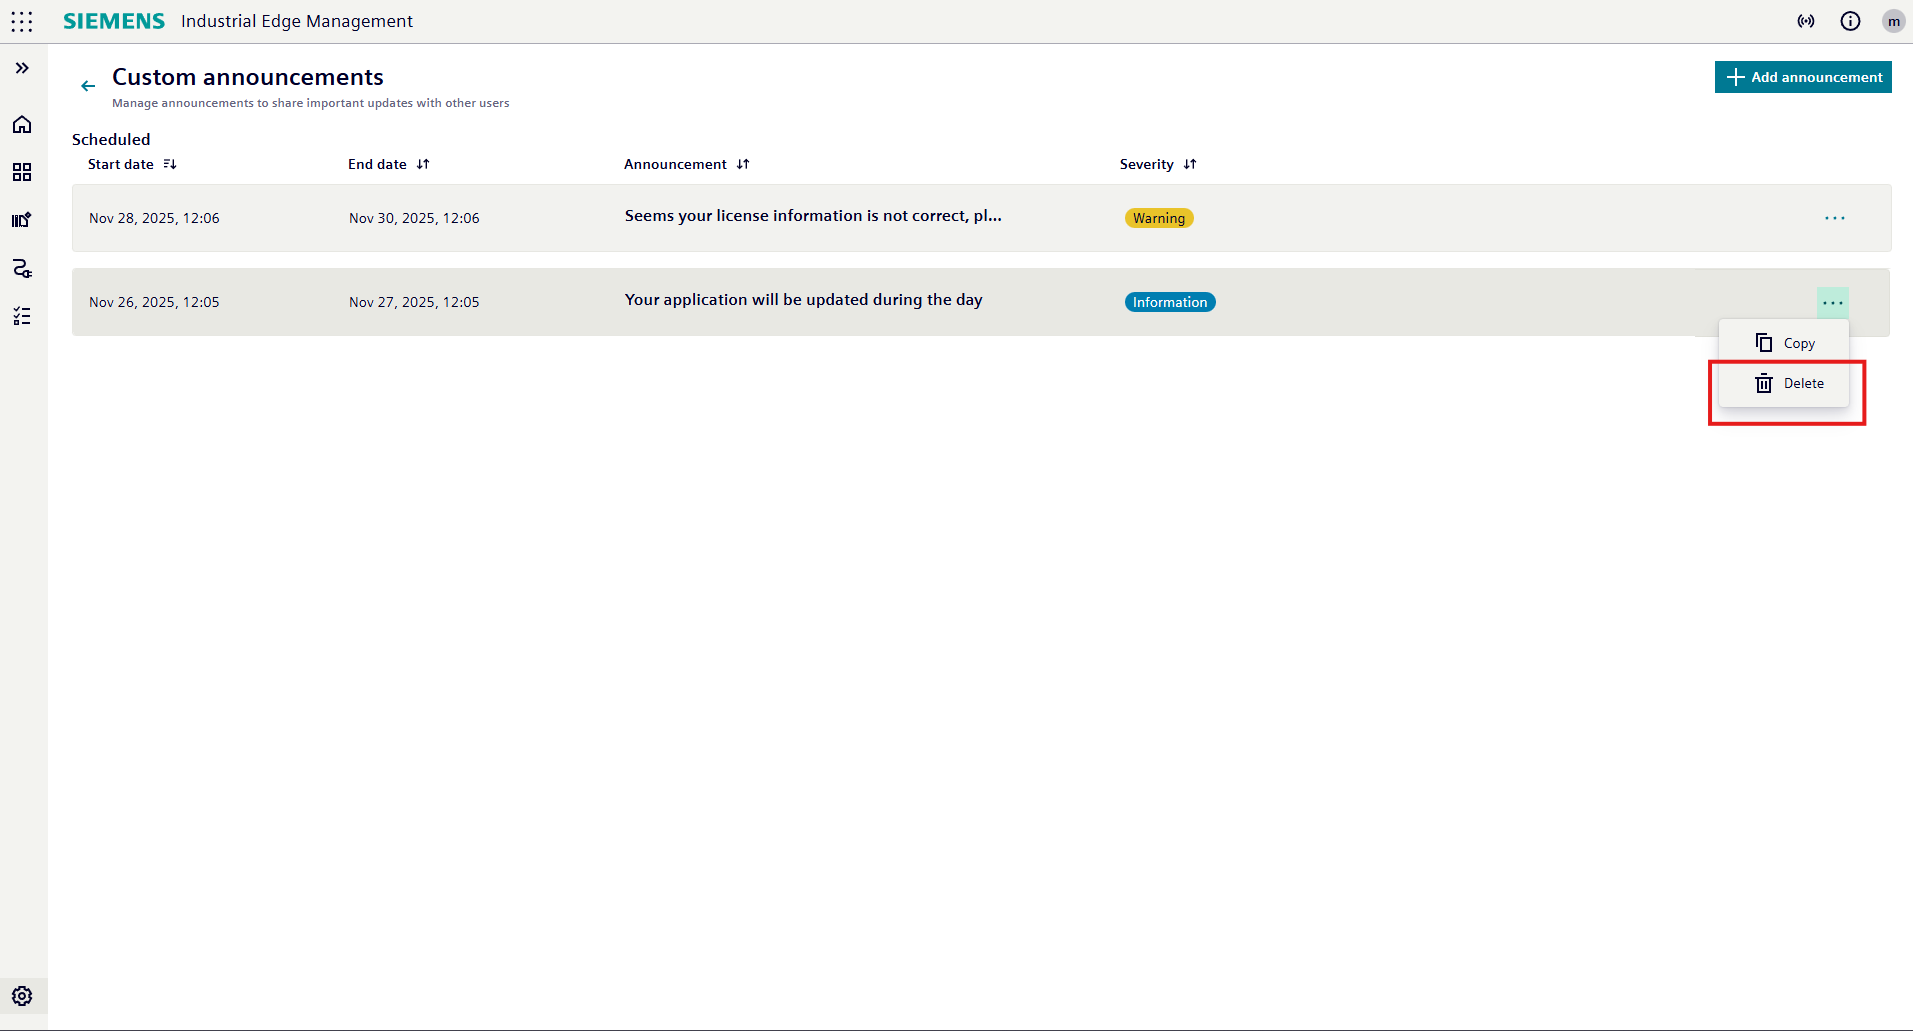
- In the list of announcements, locate the announcement you wish to delete.
- Click on the three dots icon corresponding to the announcement to open the action menu.
- Click on the trash bin icon corresponding to the announcement:
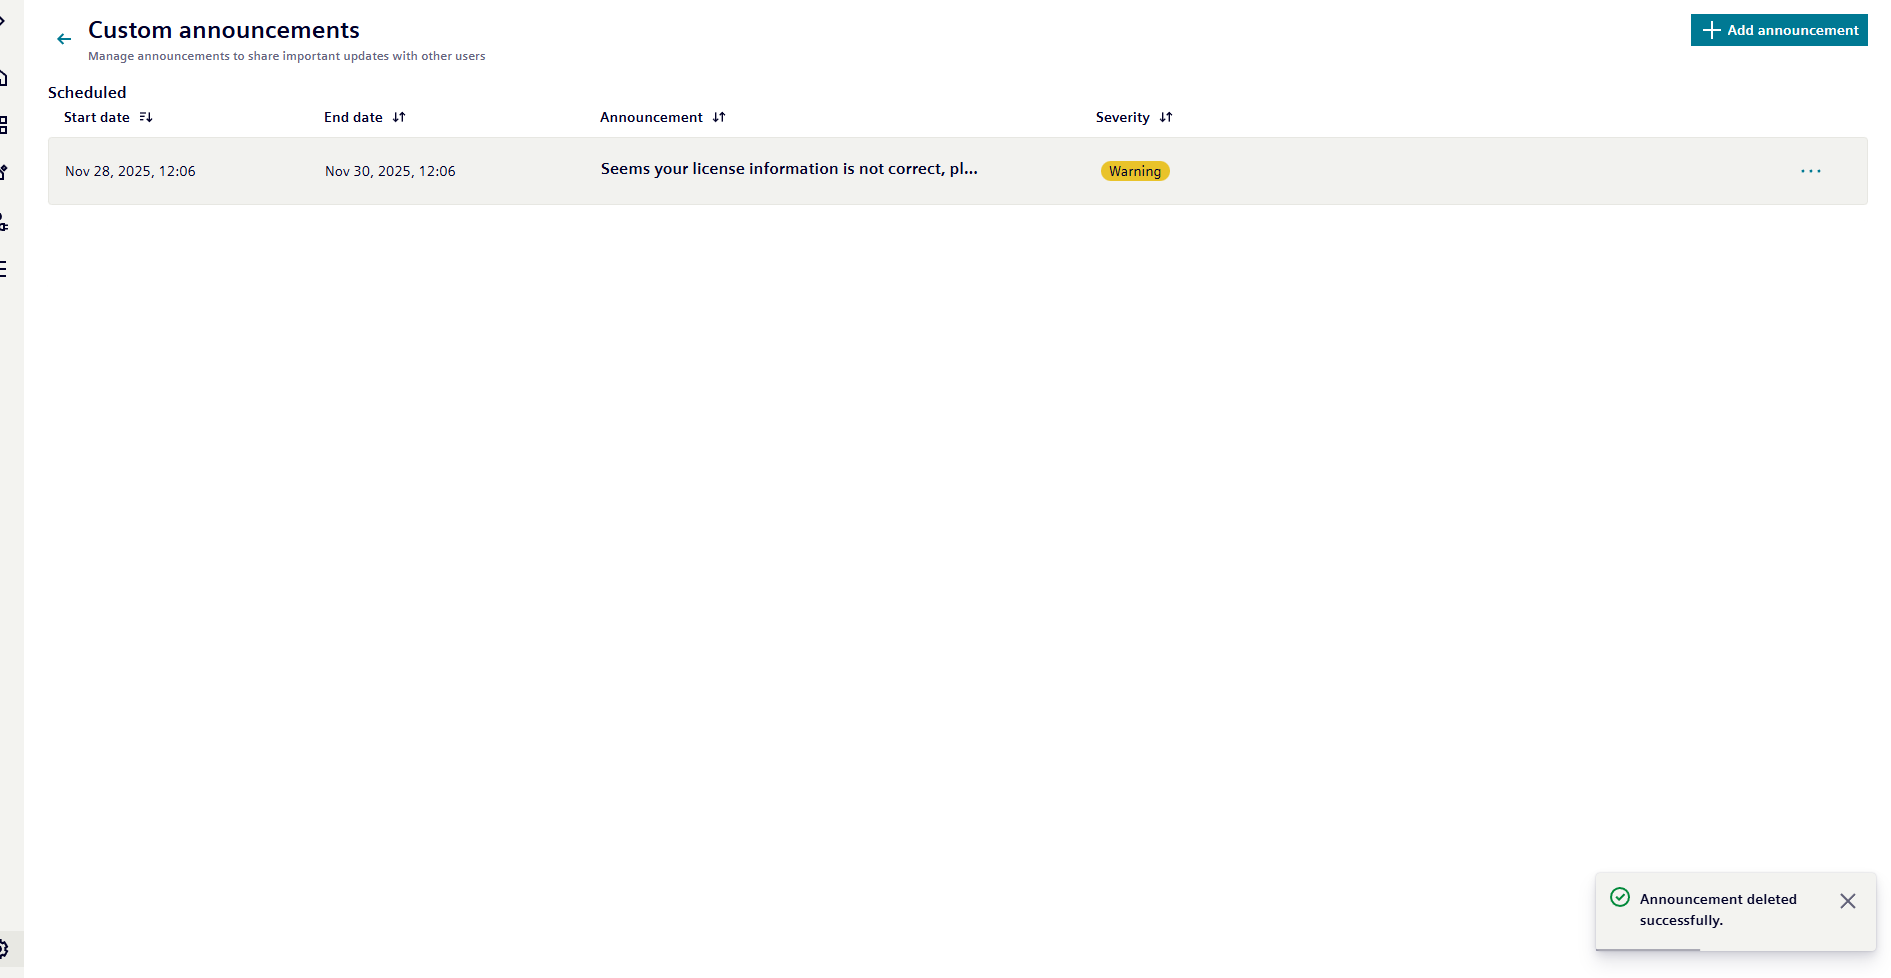
- After clicking the trash bin icon, a notification pop-up will appear at the bottom of the screen indicating that the announcement has been deleted successfully.
Copy an existing Custom Announcement
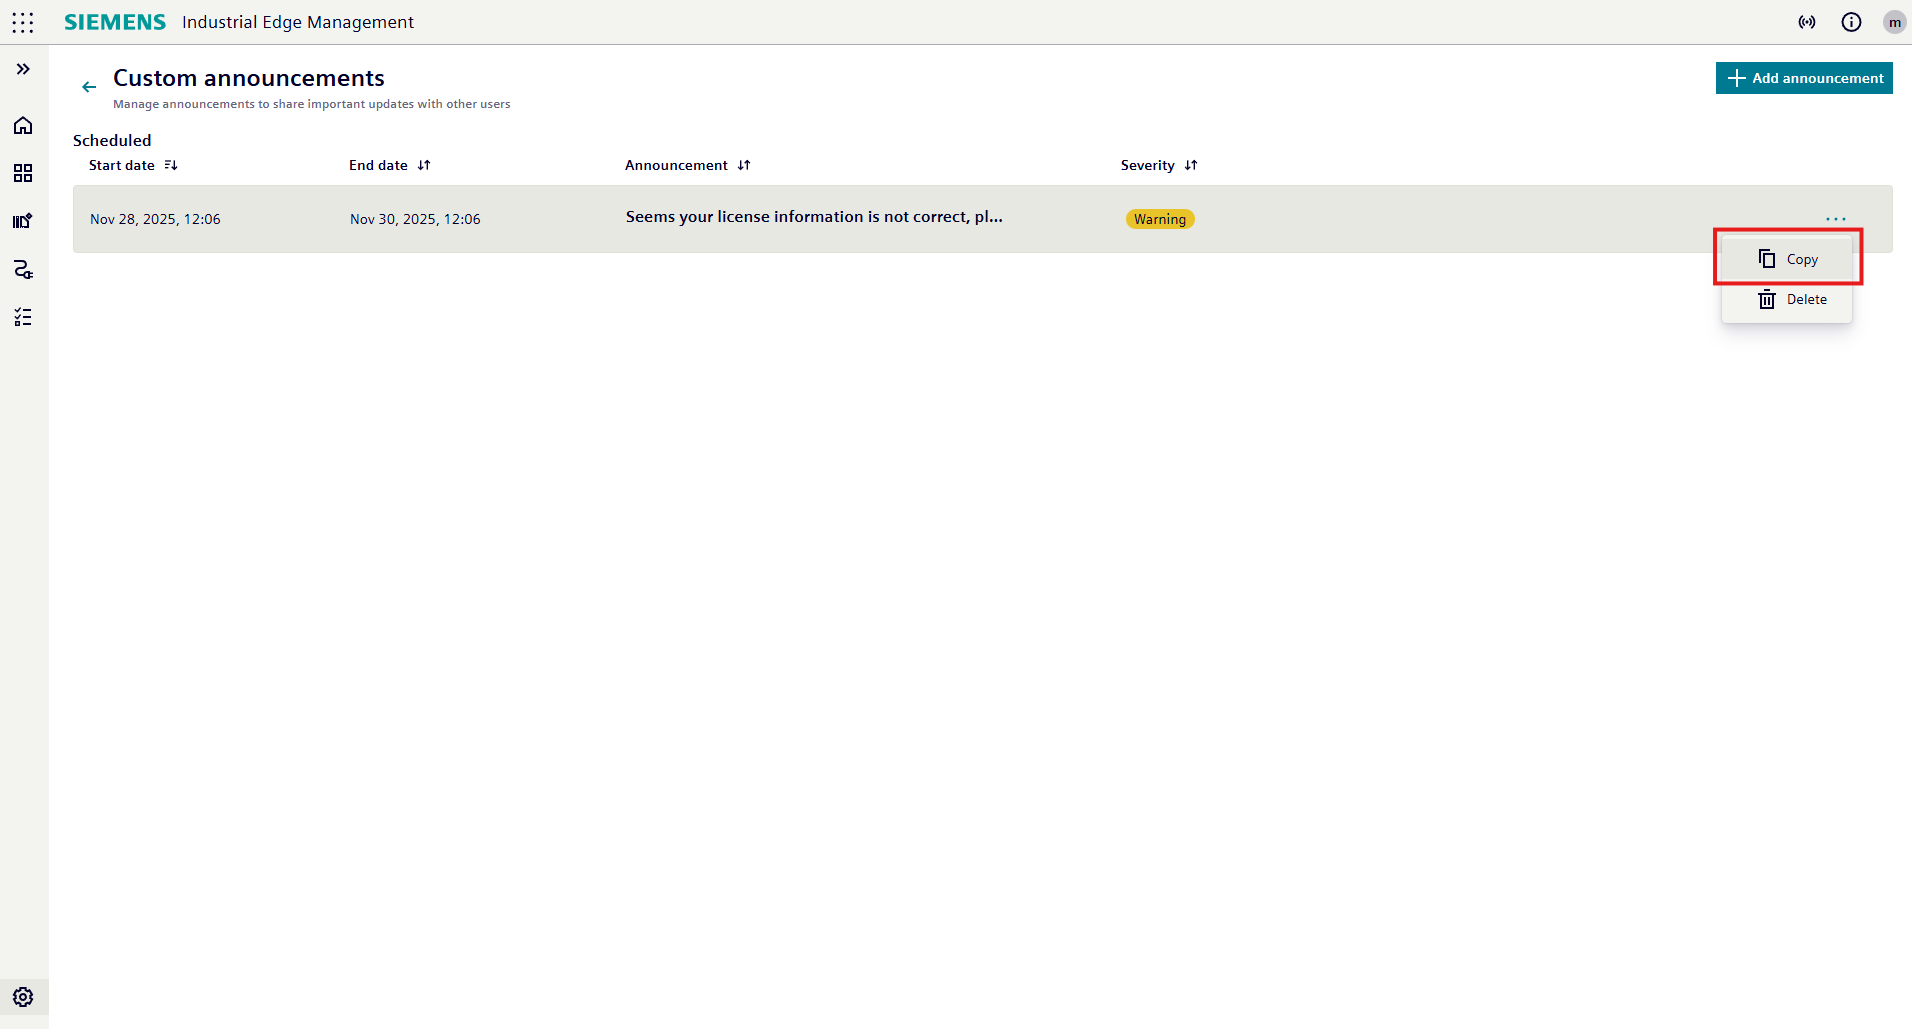
- In the list of announcements, locate the announcement you wish to copy.
- Click on the three dots icon corresponding to the announcement to open the action menu.
- Click on the copy icon corresponding to the announcement:
- After clicking the copy icon, you will be redirected to the announcement creation form with all fields pre-filled with the data from the copied announcement.
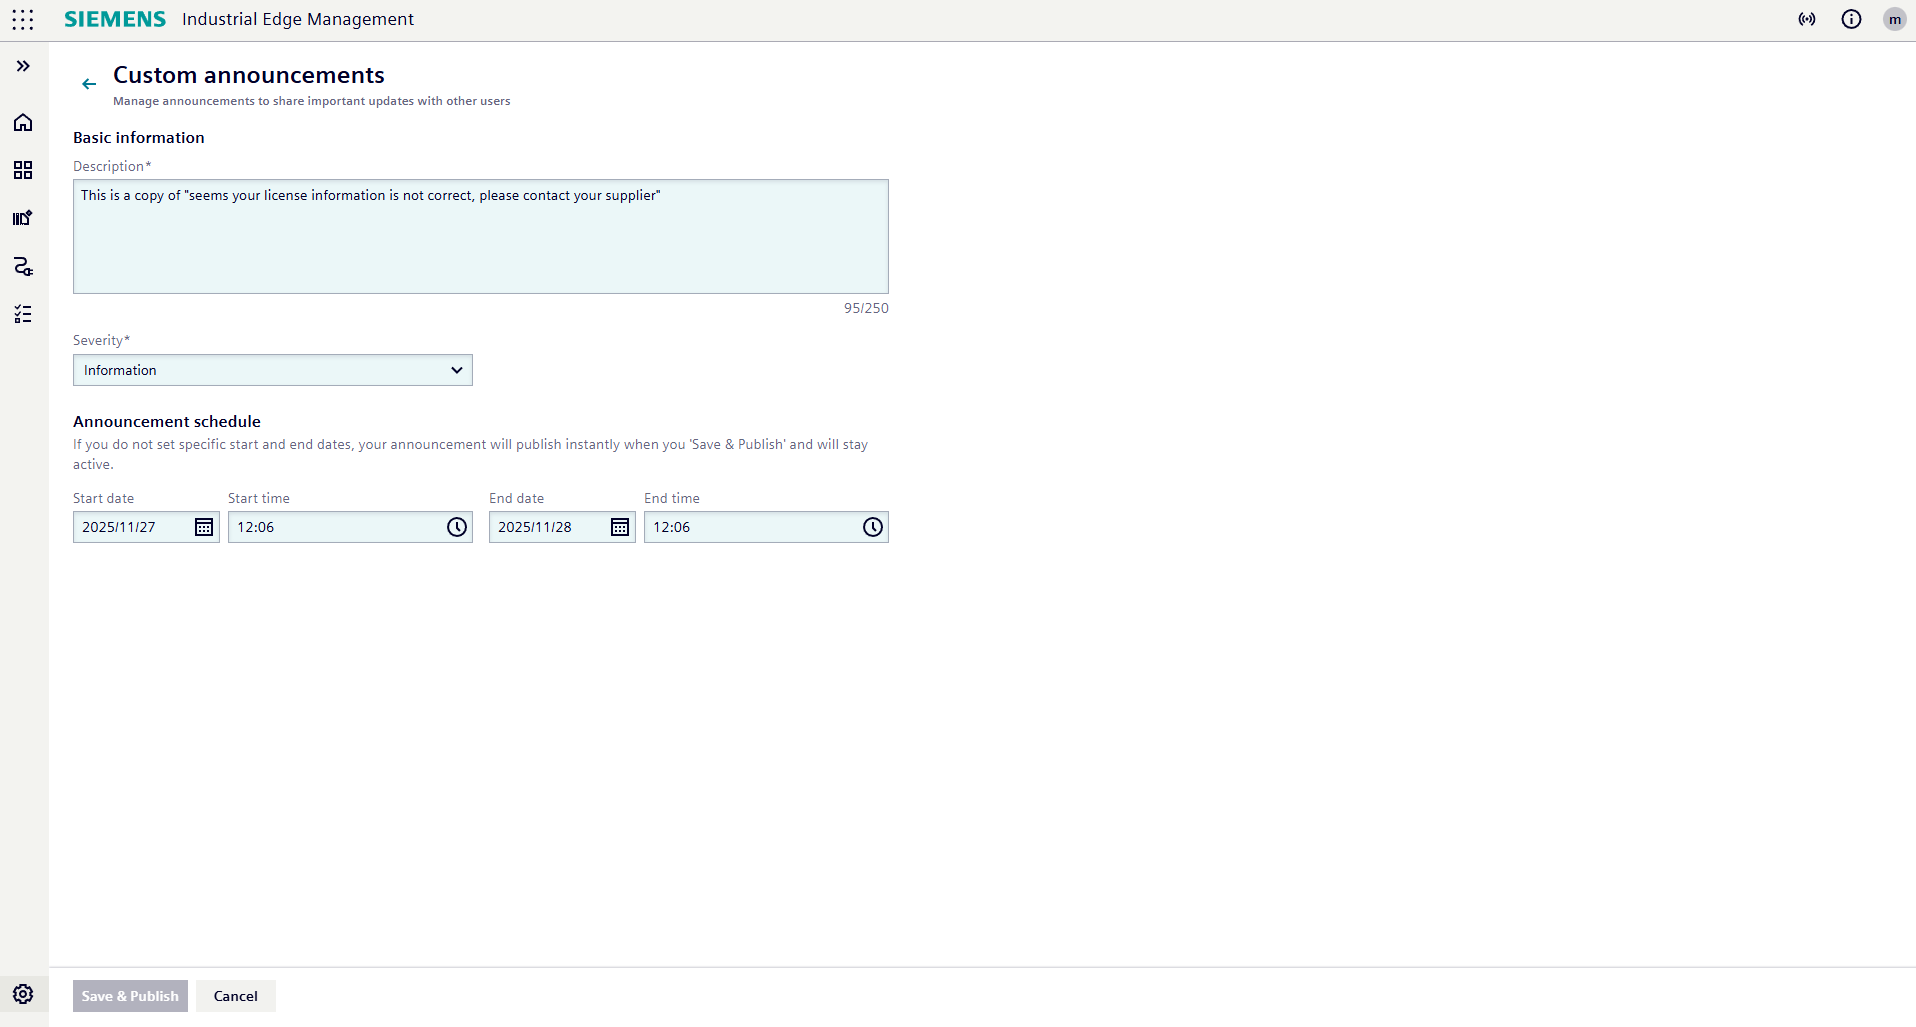
- Modify any desired fields:
- Description: Modify the content of the announcement
- Severity: Select the severity level (Info, Warning, or Critical)
- Announcement Schedule: Define the start and end date/time for the announcement visibility
- Click on
Save & Publishto save the new announcement and make it visible to users upon login if the time slot is within current time. - The newly created announcement will now appear in the list of announcements.
- If click on
Cancel, the announcement will not be saved, and you will be redirected back to the list of announcements.
Audit Events
The Audit Events service provides a centralized audit trail for the Industrial Edge Management (IEM). It records security-relevant events — such as user logins, application installations, device operations, and configuration changes — to support security monitoring, compliance, and forensic analysis.
On the Settings page, click on Audit events to access the following audit settings:
- Enable or disable the audit service
- Configure reserved storage size and retention period
- Download audit logs as an archive
For details on the audit log format, see Log Format. For Identity and Access Management (IAM) events, see IAM Events.
Permission
Only users with the admin role can access the Audit events page.
Download Audit Logs
To download audit logs, navigate to the Settings page. The download button is located in the top-right corner.
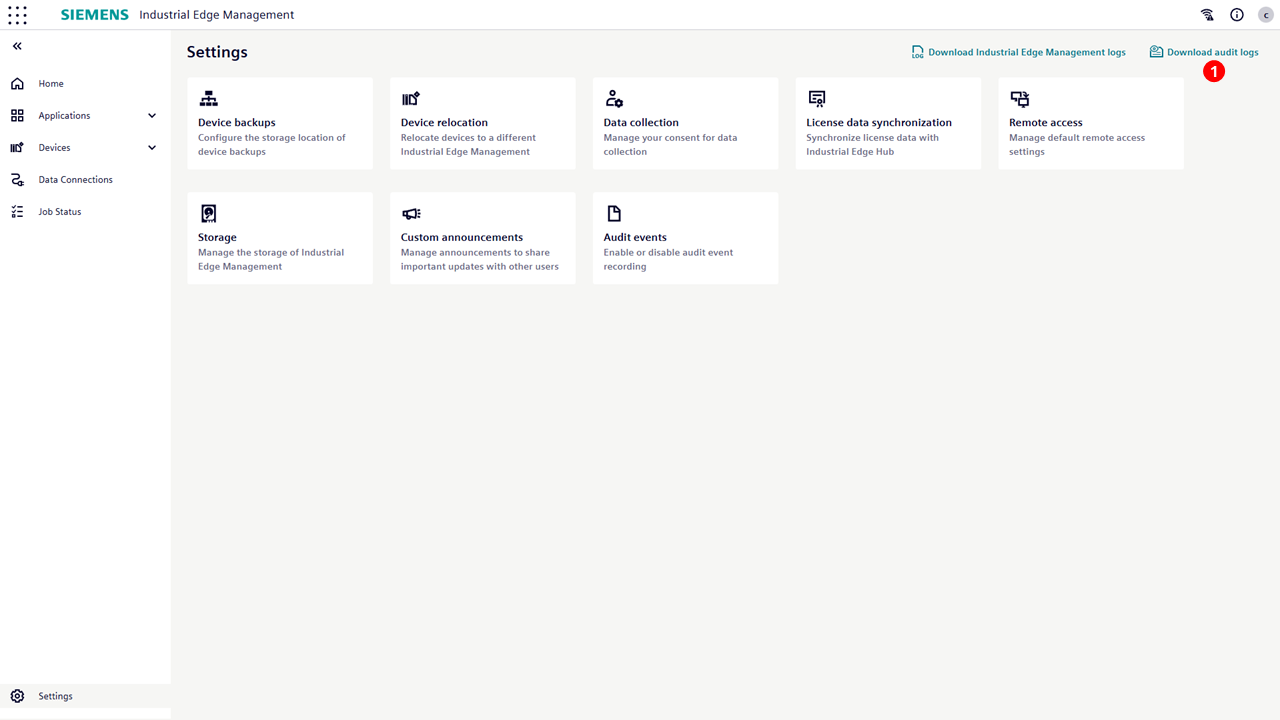
| No. | Items |
|---|---|
| ① | Click to download the audit logs as a .tar.gz archive. The archive contains rotated and decompressed log files. |
The download button state changes dynamically depending on the audit service status and user permissions. The following table describes each scenario:
| Scenario | Button State | Tooltip |
|---|---|---|
| Audit Events service enabled, log files exist | Enabled | — |
| Audit Events service disabled, old log files still exist | Enabled | — |
| Audit Events service enabled, no log files available yet | Disabled | "No audit logs available for download" |
| Audit Events service disabled, no log files available | Disabled | "To carry out this task, you need to enable audit events" |
| User lacks required permissions | Disabled | "To carry out this task, you need more permissions. Contact admin to change permissions." |
| Service or database is unreachable | Disabled | "Unable to determine audit log status. Please try again later." |
Example of a downloaded .tar.gz archive file content:
-
A rotated log file:
audit-2026_05_15_11_57_46_197.log -
Example audit event entry in this file:
{
"apiVersion":1,
"category":"audit log",
"eventID":"iem.audit.enable.success",
"message":"",
"result":"success",
"severity":5,
"source":{
    "clientAddress":"158.226.192.212",
    "componentName":"audit-service",
    "instanceID":"my-iem-instance",
    "sessionID":"9uXnNbXhVL8Dhhwa-QbArooT",
    "userID":"590f8e2d-aca8-4850-b3c2-910acbe7675e"
},
"timestamp":"2026-05-15T08:57:09.461Z",
"type":"SE_AUDIT_CFG_CHANGED"
}
Audit Events UI
On the Settings page, click on Audit events to access the Audit Events UI:
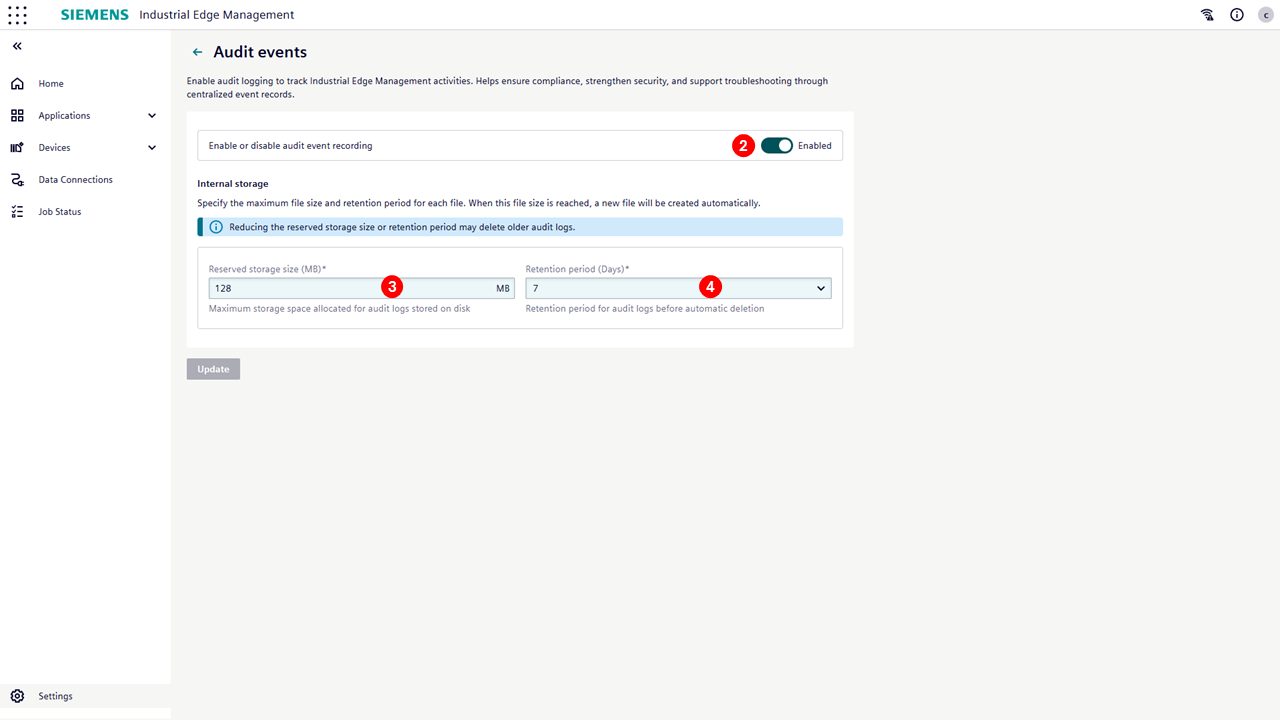
| No. | Items |
|---|---|
| ② | Enable/disable audit service. If disabled, audit logs are no longer recorded.The default is enabled. |
| ③ | Set the maximum reserved storage size for audit logs (in MB). The allowed range is 32 MB (minimum) to 5120 MB (maximum), with a default of 128 MB. Audit logs are stored internally and the active log file (audit.log) is rotated when it reaches 8 MB in size or daily, whichever comes first. Rotated files are compressed using gzip. If the total storage usage exceeds the configured maximum, the oldest compressed logs are automatically deleted. |
| ④ | Set the retention period for audit logs (in days). The allowed range is 1 day (minimum) to 30 days (maximum), with a default of 7 days. Log files older than the configured retention period are automatically removed. Cleanup is triggered when either the maximum storage size or the retention period is reached, whichever comes first. |
Confirmation Dialog Popup
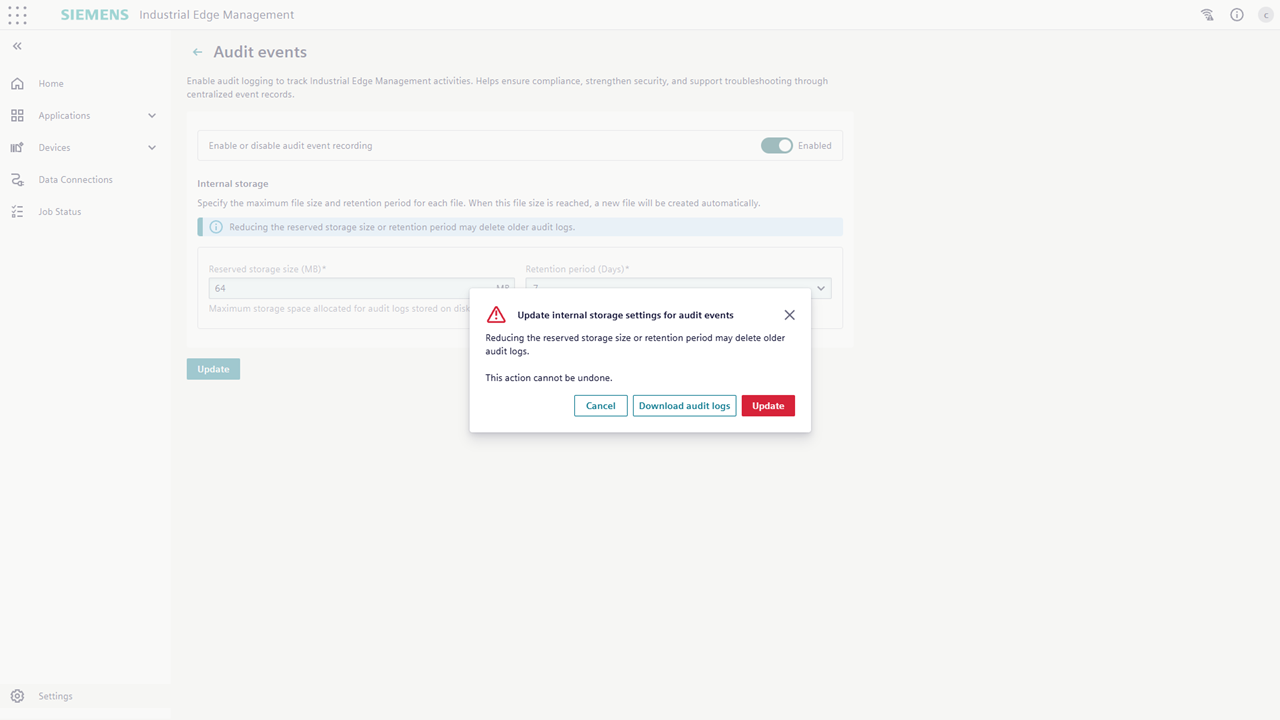
When reducing the Reserved storage size (MB) or Retention period (Days), a confirmation popup is displayed before applying the changes. This popup warns that older audit logs may be permanently deleted and the action cannot be undone. Users are given the option to download existing logs as a .tar.gz archive before proceeding or cancel the operation.
Audit Service Own Events
| eventID (Routing Key) | Security Event Type | Description |
|---|---|---|
iem.audit.enable.success |
SE_AUDIT_CFG_CHANGED | Audit service enabled. |
iem.audit.enable.failure |
SE_AUDIT_CFG_CHANGED | Enabling audit service failed. |
iem.audit.disable.success |
SE_AUDIT_CFG_CHANGED | Audit service disabled. |
iem.audit.disable.failure |
SE_AUDIT_CFG_CHANGED | Disabling audit service failed. |
iem.audit.configuration.update.success |
SE_AUDIT_CFG_CHANGED | Audit configuration updated. |
iem.audit.configuration.update.failure |
SE_AUDIT_CFG_CHANGED | Audit configuration update failed. |
iem.audit.logs.download.success |
SE_AUDIT_DATA_SAVED | Audit logs downloaded. |
iem.audit.logs.download.failure |
SE_AUDIT_DATA_SAVED | Audit logs download failed. |
iem.audit.api.access.failure |
SE_ACCESS_DENIED | Audit API non-privileged user access. |
Default Event Fallback
When an IEM component sends an audit event with an eventID that is not present in the predefined FCT list, the Audit Events service applies a default fallback mapping.
| Condition | eventID | Security Event Type |
|---|---|---|
Event with success or failure result |
iem.event.success / iem.event.failure |
SE_OBJECT_OPERATION |
| Event without a result suffix | iem.event |
SE_OBJECT_OPERATION |
This fallback ensures that unknown or unlisted events are still recorded and traceable.