Quick-Setup Guide
This guide describes how to quickly setup an Industrial Edge Management Pro (IEM Pro) on a K3s kubernetes cluster. For a production-ready cluster, follow the official K3s guide and best practices.
This guide contains instructions on how to:
-
Install of K3s
-
Install the required CLI tool - Provisioning CLI or Helm CLI
-
Create an IEM instance on the Industrial Edge Hub
-
Deploy an IEM Pro on K3s.
NOTICE
Prerequisites To follow along with this guide the following prerequisites have to be fulfilled:
- Access to the Industrial Edge Hub
- A server or computer that meets the minimal Infrastructure Requirements
- A fully qualified domain name (FQDN) for the IEM resolvable by a DNS server
Installations
Installation of K3s
NOTICE
Installation of K3s Please refer to the official K3s website for detailed information on the installation of K3s. Ensure that the minimum system requirements are satisfied.
-
Install K3s by using the following command:
curl -sfL https://get.k3s.io | sh -This will install K3s with it's default configuration, including Traefik as an ingress controller.
-
After a few minutes, the installation should be complete.
To verify the installation try listing the available nodes:
sudo k3s kubectl get node -
Configuring the kubeconfig
NOTICE
kubeconfig During the installation of the IEM Pro the
kubeconfigin~/.kube/configis used andenvironment variableswill be ignored!As K3s saves the
kubeconfigunder/etc/rancher/k3s/k3s.yamlthe config has to be moved or a symbolic link has to be created to~/.kube/config:mkdir ~/.kube/ ln -s /etc/rancher/k3s/k3s.yaml ~/.kube/config sudo chown $USER:$USER ~/.kube/configNOTICE
The client and server certificates of the K3s cluster are only valid for a certain time! Checkout the official k3s certificate documentation for more information.
Installation of required CLI toolings
For setting up an IEM Pro there are the following options:
-
Using the Helm CLI
NOTICE
When setting up an IEM Pro with the Helm CLI it is recommended to use at least the Helm Chart version 1.15.9 or newer.
The following describes how to install both tools:
-
Log into the Industrial Edge Hub.
China Region
For users in China region please log into the Industrial Edge Hub China
-
Navigate to
Download Software. -
In the
Industrial Edge Provisioning CLI - Ubuntutile, clickDownload.The IE Provisioning CLI for Linux is downloaded to your Internet browser's default download folder.
Windows Users
To provision the IEM Pro from a Windows host use the Industrial Edge Control (IECTL)
-
To execute the IE Provisioning CLI, install the binary:
sudo install ieprovision /usr/local/bin/ -
Verify the installation by showing the installed version:
ieprovision version
NOTICE
Installation of Helm Please refer to the offical Helm website for detailed information on the installation of Helm and ensure that the minimum system requirements are satisfied.
-
Install Helm by using following command:
curl https://raw.githubusercontent.com/helm/helm/main/scripts/get-helm-3 | bashThis will install the latest version of Helm through the installer script.
-
After a short moment, the installation should be complete.
To verify the installation by showing the installed version:
helm version
Preparation
Network Configuration
Verify that the kubernetes cluster has outbound internet connectivity to access all required Industrial Edge Hub endpoints - Contacted domain names.
NOTICE
If the Provisioning CLI is used for the setup, the host on which the Provisioning CLI is executed needs to have access to these domains as well.
Access to these domains is required for the initial activation of the IEM against the Industrial Edge Hub, as well as pulling required container images and getting other information e.g. a list of all available Industrial Edge Device Types.
Cluster Preparation
Setup a kubernetes namespace for the IEM installation:
export NAMESPACE=iem
kubectl create namespace $NAMESPACE
NOTICE
Environment Variables Feel free to change any environment variables that are set in this Quick-Setup Guide
TLS Certificates
As part of the IEM, a gateway that serves endpoints for UI or API interaction will be deployed. The gateway can be accessed by a browser or other clients like Industrial Edge Devices (IEDs). To secure communication concerning authenticity and integrity, the gateway uses TLS (Transport Layer Security) through certificates. These certificates have to be provided during the installation process. Checkout the IEM Certificate Management section for further information.
NOTICE
Certificate requirements
The IEM certificate has to fulfill certain requirements, e.g. including a full chain of trust! Make sure to check out the Certificate Import Guidelines section for more information on the specific requirements the certificate has to fulfill.
If the certificate is not fulfilling these requirements the onboarding of Industrial Edge Device to the Industrial Edge Management will NOT be possible, or triggered management operations like the execution of firmware updates of device will FAIL!
Furthermore it is recommended to create certificates that are signed by either:
- Public Certificate Authority (CA)
- Private Enterprise Certificate Authority (CA)
-
Generation of TLS certificates
The following example shows how to create certificates using openssl with sample data. This includes the creation of a Private Root Certificate, an Intermediate Certificate and Server Certificates for the IEM Pro.
Generate certificate by providing DNS name
In order to create certificates copy the the below mentioned files in the same folder.
Files for certificate generation
gen_with_ca_DNS.sh#!/bin/bash path=$(dirname "$0") IEM_NAME=$1 mkdir -p "${path}"/out # Constants for certificate validity ROOT_CERT_DAYS=3650 # 10 years INTERMEDIATE_CERT_DAYS=1825 # 5 years SERVER_CERT_DAYS=365 # 1 year # Check the length of the DNS name length=${#IEM_NAME} if [ $length \> 63 ] then echo "WARNING: string too long for CN, will be adjusted" arrCN=(${IEM_NAME//./ }) IEM_NAME_CN=*.${arrCN[-3]}.${arrCN[-2]}.${arrCN[-1]} echo "new CN $IEM_NAME_CN" else IEM_NAME_CN=$IEM_NAME fi # 1. Gernate Root Cert openssl genrsa -out "${path}"/out/rootCert.key 4096 openssl req -x509 -new -nodes -key "${path}"/out/rootCert.key -sha256 -days ${ROOT_CERT_DAYS} -out "${path}"/out/rootCert.crt -config "${path}"/rootCert.conf # 2. Generate Intermediate Cert openssl genrsa -out "${path}"/out/intermediateCert.key 4096 openssl req -new -key "${path}"/out/intermediateCert.key -out "${path}"/out/intermediateCert.csr -config "${path}"/intermediateCert.conf openssl x509 -req -in "${path}"/out/intermediateCert.csr -CA "${path}"/out/rootCert.crt -CAkey "${path}"/out/rootCert.key -CAcreateserial -out "${path}"/out/intermediateCert.crt -days ${INTERMEDIATE_CERT_DAYS} -sha256 -extfile "${path}"/intermediateCert-ext.conf # 3. Generate Server Certificate (IEM Certificate) openssl genrsa -out "${path}"/out/serverCert.key 4096 openssl req -new -key "${path}"/out/serverCert.key -out "${path}"/out/serverCert.csr -subj "/C=DE/ST=Dummy/L=Dummy/O=Dummy/CN=$IEM_NAME_CN" -config <(cat "${path}"/serverCert.conf <(printf "\\n[alt_names]\\nDNS=%s" "${IEM_NAME}")) openssl x509 -req -in "${path}"/out/serverCert.csr -CA "${path}"/out/intermediateCert.crt -CAkey "${path}"/out/intermediateCert.key -CAcreateserial -out "${path}"/out/serverCert.crt -days ${SERVER_CERT_DAYS} -sha256 -extfile <(cat "${path}"/serverCert-ext.conf <(printf "\\n[alt_names]\\nDNS=%s" "${IEM_NAME}")) # Create Chain File cat "${path}"/out/serverCert.crt "${path}"/out/intermediateCert.crt > "${path}"/out/chain_without_rootCert.crt cat "${path}"/out/serverCert.crt "${path}"/out/intermediateCert.crt "${path}"/out/rootCert.crt > "${path}"/out/fullChain.crt # Verify the generated certificates openssl verify -CAfile "${path}"/out/rootCert.crt "${path}"/out/intermediateCert.crt openssl verify -CAfile "${path}"/out/rootCert.crt -untrusted "${path}"/out/intermediateCert.crt "${path}"/out/serverCert.crt # Cleanup rm "${path}"/out/*.srl 2>/dev/null rm "${path}"/out/*.csr 2>/dev/null # Output the generated files echo echo "========================================" echo echo "Generated certificates:" echo "Root Cert: ${path}/out/rootCert.crt" echo "Intermediate Cert: ${path}/out/intermediateCert.crt" echo "IEM Certificate: ${path}/out/serverCert.crt" echo echo "Generated keys:" echo "Root Cert Key: ${path}/out/rootCert.key" echo "Intermediate Cert Key: ${path}/out/intermediateCert.key" echo "IEM Key: ${path}/out/serverCert.key" echo echo "Generated certificate Chains:" echo "Certificate Chain excluding the Root Cert: ${path}/out/chain_without_rootCert.crt" echo "Full Chain: ${path}/out/fullChain.crt"rootCert.conf[req] distinguished_name = req_distinguished_name x509_extensions = v3_ca prompt = no [req_distinguished_name] C = DE ST = Dummy L = Dummy CN = My Personal Root CA [v3_ca] subjectKeyIdentifier = hash authorityKeyIdentifier = keyid:always,issuer basicConstraints = critical,CA:true keyUsage = critical,digitalSignature,keyEncipherment,keyCertSign,cRLSignintermediateCert.conf[req] distinguished_name = req_distinguished_name prompt = no [req_distinguished_name] C = DE ST = Dummy L = Dummy O = Dummy CN = My Personal Intermediate CAintermediateCert-ext.confbasicConstraints = critical,CA:true,pathlen:0 keyUsage = critical,digitalSignature,cRLSign,keyCertSign subjectKeyIdentifier = hash authorityKeyIdentifier = keyid,issuerserverCert.confIEM = "" [req] default_md = sha512 basicConstraints=CA:FALSE keyUsage = digitalSignature, nonRepudiation, keyEncipherment, dataEncipherment default_keyfile = myCert.key x509_extensions = v3_ca prompt = no authorityKeyIdentifier=keyid,issuer distinguished_name = req_distinguished_name req_extensions = req_ext [req_distinguished_name] C=DE ST=Dummy L=Dummy O=Dummy CN=localhost [req_ext] subjectAltName = @alt_names [v3_ca] subjectAltName = @alt_namesserverCert-ext.confbasicConstraints = CA:FALSE nsCertType = server nsComment = "My Certificate" subjectKeyIdentifier = hash authorityKeyIdentifier = keyid,issuer:always keyUsage = nonRepudiation, digitalSignature, keyEncipherment extendedKeyUsage = serverAuth subjectAltName = @alt_namesAfterwards make the script executable:
Make the `gen_with_ca_DNS.sh` script executablechmod +x gen_with_ca_DNS.shThen execute the script to create the certificates, while providing the DNS hostname for the IEM.
Generate certificates using the `gen_with_ca_DNS.sh` scriptHOSTNAME=iem.edge.siemens.com ./gen_with_ca_DNS.sh $HOSTNAME -
Create a kubernetes
secretcontaining the IEM gateway certificates:The TLS secret should contain the private key of the server certificate and server certificate of the IEM, incl. all intermediate certificates for easier trust management.
export SECRET=iemcert
export PATH_TO_CERT=./out/chain_without_rootCert.crt
export PATH_TO_KEY=./out/serverCert.key

kubectl create --namespace $NAMESPACE secret tls $SECRET --cert=$PATH_TO_CERT --key=$PATH_TO_KEY
Creation of an IEM instance on the IEHub
-
Log into the Industrial Edge Hub.
China Region
For users in China region please log into the Industrial Edge Hub China
-
Navigate to
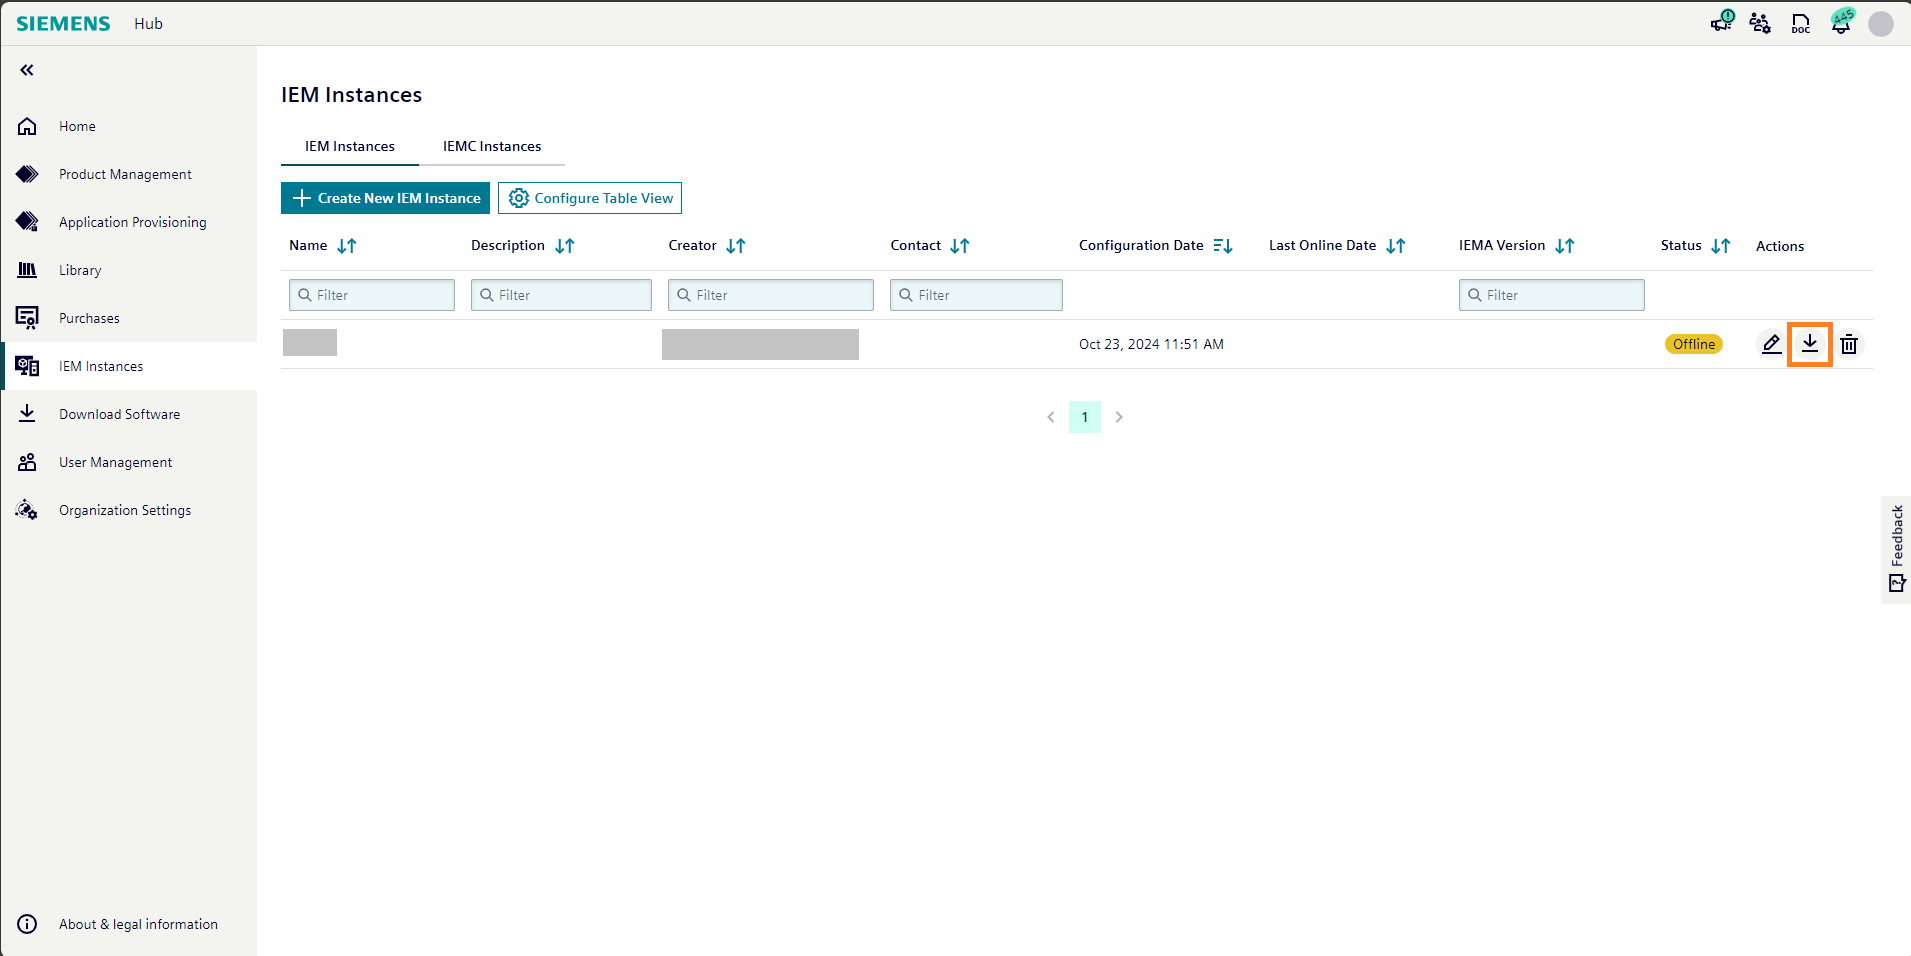
IEM Instancesand clickCreate New IEM Instance. -
Enter the name for the IEM instance.
Optional a description and contact information can be provided as well.
-
Click
Save.The IEM instance has been created.
-
Click the download icon to download the configuration file of the newly created IEM instance. This file will be used for the onboarding of an IEM instance against the Industrial Edge Hub
NOTICE
After downloading, the configuration file is valid only for 1 hour.
The configuration file looks like this for example:
Example configuration file
config.json{ "deviceId": "102ea1489b76473596ef4911d2a88ab4", "deviceName": "MyInstance", "deviceCreator": "deviceCreator@siemens.com", "deviceOwner": "", "description": "", "deviceValidateKey": "eyJhbGciOiJQUzI1NiJ9.eyJpYXQiOjE2NTc3ODYwMjgsI...", "potalUrl": "portal.eu1.edge.siemens.cloud:443", "portalUrl": "portal.eu1.edge.siemens.cloud:443", "nodeId": "b6da72ea386d4963abb384e0fb1bef66", "platformId": "d522704551ed4182892d01d896e53bf1", "userId": "d122e802a3314e828a02453d239708c4", "iems": { "iemsAppId": "f139d6d8cb384bb08fd2b16ce8d8e2e9" }, "isDeviceBuilder": false, "isTestDevice": false, "isIEMaaS": false }
IEM Pro deployment
IEM Pro deployment on K3s
The following shows how to deploy the IEM Pro to an K3s kubernetes cluster with minimal effort, using the Siemens provided Provisioning CLI or the Helm CLI.
-
Activate the downloaded configuration for the IEM instance against the Industrial Edge Hub
export PATH_TO_IEM_CONFIG=config.json
ieprovision activate $PATH_TO_IEM_CONFIG --namespace $NAMESPACE --verbose
NOTICE
Ensure to provide the path to your IEM configuration file instead of the
config.json.
Example:./configuration-1a457v7cjndhvhjcn843.jsonWindows Users
When using the Industrial Edge Control (IECTL) use
iectl provisioninstead ofieprovision -
Verify the activation by listing the activated IEM instances in the cluster
ieprovision list --namespace $NAMESPACE -
Install the IEM Pro on the K3s cluster with FQDN hostname
export PATH_TO_CHAIN=./out/rootCert.crt

ieprovision install \
--namespace $NAMESPACE \
--set global.hostname=$HOSTNAME \
--set global.storageClassPg="local-path" \
--set global.storageClass="local-path" \
--set global.certChain="$(cat $PATH_TO_CHAIN | base64 -w 0)" \
--set global.gateway.ingress.enabled=false \
--verbose
NOTICE
If you are using a DNS name, ensure that $HOSTNAME is set to your DNS name.
To request additional information during the installation the
--verboseflag is added to the installation command.Explanation of the installation parameters
Parameter Explanation Default Value Example Value --set global.hostname Enter the FQDN (Fully Qualified Domain Name) of your cluster iem.edge.siemens.com --namespace Namespace of your IEM iem iem --set global.storageClass Storage class used for the IEM components standard local-path --set global.StorageClassPg Storage class used for the Postgress database of the IEM standard local-path --set global.certChain base64 endoded private root certificate (if certificates are not public trusted) ./out/rootCert.crt --set global.gateway.ingress.enabled By default a Gateway Ingress of type nginx is deployed true false In the shown installation command the used StorageClasses will be set to
local-path, as this is the default StorageClass for a K3s installation. Furthermore the default Gateway Ingress (of type nginx) will be disabled, since K3s uses Traefik as an default ingress controller.
China Region
For users in China region please note that the Helm repository isn't yet public available in China. Download the Helm Chart from the Industrial Edge Hub China and provide it as input:
helm install <releasename> ./application-management-service-<version>.tgz
-
Adding the public Helm repository for the IEM using this command:
helm repo add iehub https://repo.portal.eu1.edge.siemens.cloud/publicThis adds the repository under the name of
iehub. The name can be freely chosen but please note that all further steps in the documentation will use the nameiehub. If a different name has been used all following commands have to be adapted accordingly. -
Verify that the repository has been added with the name
iehubasiehub/application-management-service, by checking out the latest available chart:helm repo update iehub helm search repo iehub/application-management-serviceListing all available charts
Listing all available charts can be done using:
helm repo update iehub helm search repo iehub/application-management-service --versions -
Update the Helm repository to ensure, that the latest Helm versions are available.
helm repo update iehub -
Install the IEM Pro on the K3s cluster with FQDN hostname
export RELEASE_NAME=helmiem
export PATH_TO_IEM_CONFIG=config.json
export PATH_TO_CHAIN=./out/rootCert.crt

helm install $RELEASE_NAME iehub/application-management-service \
--namespace $NAMESPACE \
--set-file global.activationConfig=$PATH_TO_IEM_CONFIG \
--set global.hostname=$HOSTNAME \
--set global.storageClassPg="local-path" \
--set global.storageClass="local-path" \
--set global.certChain="$(cat $PATH_TO_CHAIN | base64 -w 0)" \
--set global.gateway.ingress.enabled=false \
--debug \
--timeout 30m0s
NOTICE
Ensure to provide the path to your IEM configuration file instead of the
config.json.
Example:./configuration-1a457v7cjndhvhjcn843.jsonIf you are using a DNS name, ensure that $HOSTNAME is set to your DNS name.To request additional information during the installation the
--debugflag is added to the installation command. Furthermore the default timeout setting of the Helm installation is set to 30 minutes using the paramter--timeout 30m0s, since the default timeout of 5m0s might be too short for the installation to fully complete on some systems.Explanation of the installation parameters
Parameter Explanation Default Value Example Value --set-file global.activationConfig Path to your IEM onboarding file downloaded in step Create an IEM Instance in the Industrial Edge Hub for the activation of the IEM ./configuration-1a457v7cjndhvhjcn843.json --set global.hostname Enter the FQDN (Fully Qualified Domain Name) of your cluster iem.edge.siemens.com --namespace Namespace of your IEM iem iem --set global.storageClass Storage class used for the IEM components standard local-path --set global.StorageClassPg Storage class used for the Postgress database of the IEM standard local-path --set global.certChain base64 endoded private root certificate (if certificates are not public trusted) ./out/rootCert.crt --set global.gateway.ingress.enabled By default a Gateway Ingress of type nginx is deployed true false In the shown installation command the used StorageClasses will be set to
local-path, as this is the default StorageClass for a K3s installation. Furthermore the default Gateway Ingress (of type nginx) will be disabled, since K3s uses Traefik as an default ingress controller.
Depending on the available resources the deployment of the IEM Pro might take up to 30 minutes. Afterward the credentials for two automatically created users are printed to the terminal. Make sure to save the passwords!
- Initial IEM User:
iem_user- Admin user of the IEM with no access to the Identity and Access Management - Customer Realm Admin:
customer_admin- Admin user of the IEM with admin access to the Identity and Access Management
Ingress Deployment
Deploy an K8s Ingress to make the IEM accessable from outside of the cluster. Since the default K3s installation includes the Traefik Ingress Controller, a Traefik ingress will be deployed as part of this guide.
This can be done as shown:
Example Ingress
Create an ingress resource definition file like ingress_template.yaml
apiVersion: networking.k8s.io/v1
kind: Ingress
metadata:
  name: iem-ingress
  namespace: NAMESPACE
  annotations:
    traefik.ingress.kubernetes.io/ssl-redirect: "true"
spec:
  ingressClassName: traefik
  tls:
  - hosts:
    - HOSTNAME
    secretName: SECRET
  rules:
  - host: HOSTNAME
    http:
      paths:
      - path: /
        pathType: Prefix
        backend:
          service:
            name: GATEWAY_SERVICE
            port:
              name: kong-proxy
All variables written in capital letters have to be replaced.
The value for the GATEWAY_SERVICE has to be replaced with the name of the gateway service of the IEM.
Whereas the rest can be replaced with the value of the mentioned environment variables.
When following the guide this can be accomplished by executing the following commands:
export GATEWAY_SERVICE=$(kubectl get svc -n $NAMESPACE | grep gateway-proxy | awk '{print $1}')

sed -e "s/HOSTNAME/$HOSTNAME/g" -e "s/GATEWAY_SERVICE/$GATEWAY_SERVICE/g" -e "s/SECRET/$SECRET/g" -e "s/NAMESPACE/$NAMESPACE/g" ./ingress_template.yaml > ingress.yaml
Deploy the ingress
kubectl apply -f ingress.yaml
With the deployment of an Traefik ingress the installation of an IEM Pro is complete!