Migrate IEM Virtual from VMware to Hyper-V
Purpose
Migrate Industrial Edge Management (IEM) Virtual Machines from VMware environments to Microsoft Hyper-V while maintaining system functionality and data integrity.
Target Audience
IT Administrators responsible for virtualization platform management and Industrial Edge infrastructure deployment.
Summary and Key Takeaways
- Migration supports IEM Virtual version 2.6.x exclusively
- Process involves VM export, disk format conversion, and Hyper-V configuration
- Windows Server 2019 or later required for production deployments
- Complete migration takes 2-4 hours depending on VM disk size
- Do not reduce allocated resources during migration: keep the same or higher vCPU / RAM as on VMware (minimum remains 4 vCPUs / 16GB RAM)
Version Requirement
IEM Virtual 2.6.x is the only supported version for migration. Earlier or later releases cannot be migrated.
Windows Server 2019 or later is required for production migrations. Windows 10/11 may work for testing but are not validated or supported.
NOTICE
We recommend trying the process with a newly onboarded IEM Virtual before converting production ones. Create a backup of your VMWare based VM, that can be restored in the attempt of unforseen events before starting the migration process.
The IEM Virtual must be provisioned before conversion to Hyper-V. Non-provisioned IEM Virtual instances are not allowed for the migration.
Important Notice for Static IP Systems
To migrate static ip based systems from hyper-v to vmware and when you have to change the IP address, you have to add the new ip address first in keycloack before you export the VM. Static IP systems without FQDN requiring IP address range changes can be reconfigured via console login. Certificate updates are required to reflect the new IP address. Existing devices will not automatically reconnect and require re-onboarding.
Prerequisites
Required Knowledge:
- VMware virtual machine management
- Hyper-V administration
- Basic Linux command-line operations
- Network configuration concepts
System Requirements:
- IEM Virtual Version: IEM Virtual must be exactly version 2.6.0 for migration. Versions higher or lower than 2.6.0 cannot be migrated and are not supported for this migration process.
- VMware Environment Access: Access to your VMware environment (Workstation or ESXi) with the VM powered off.
- Windows System: Administrative access to a Windows computer with Hyper-V capability.
- Linux System: Access to a Linux machine (Ubuntu/Debian recommended) for disk conversion.
- Supported Platforms: This migration is only supported on Windows Server 2022 or higher
Storage and Tools:
- Storage Requirements: Sufficient storage space for exported and converted files (approximately 3x the VM disk size).
- Conversion Tool:
qemu-img(recommended tool for VMDK to VHDX conversion). - Archive Tools: tar for extracting OVA files (if using ESXi).
Network and Backup:
- Network Configuration: Document current VM network settings and IP address configuration.
- Backup: Complete backup of your VM and any important data before starting.
Hyper-V Configuration:
- Hyper-V Feature: Hyper-V enabled on Windows system.
- VM Resources: 4 CPUs and 16GB RAM allocation for the migrated VM.
- Disk: Converted VHDX file will be reused as the VM's primary disk.
- Network Setup: Virtual switch configured in Hyper-V (or use Default Switch).
Limitations:
- Dynamic RAM is not supported. Please use fixed RAM for your VM.
- Snapshots are not supported. Do not use snapshots with your migrated VM.
NOTICE
- Migration is only supported for version 2.6.0 exactly. Versions higher than 2.6.0 or lower than 2.6.0 do not support this migration process and cannot be migrated.
- Provisioned The IEM Virtual must be provisioned before conversion to Hyper-V. Non-provisioned IEM Virtual instances are not allowed for the migration.
- Running the VMware and Hyper-V versions of your IEM Virtual Machine simultaneously can lead to data corruption. After migrating to Hyper-V, keep the VMware VM powered off to avoid data conflicts and possible system corruption.
- Use
qemu-imgon a Linux system for disk conversion. Other tools or platforms may result in non-bootable or unstable VMs. - If your IEM Virtual is a production environment and configured with a Fully Qualified Domain Name (FQDN), IP address changes after migration are supported. Otherwise, ensure the target network matches the original VM's IP address, netmask, and gateway settings.
Procedure
Step 1: Prepare for Migration
- Create a complete backup of the VM and critical data to a secure location
- Document current network settings including: MAC address of the primary NIC (from VMware settings), IP address (or DHCP usage), netmask, gateway, DNS servers, and any DHCP reservation / firewall entries tied to the MAC
- Verify IEM Virtual version is 2.6.x using the Service and Maintenance
- Record the original VMware MAC address (Right-click VM > Settings > Network Adapter > Advanced). You will reapply it in Step 7 to keep DHCP reservations, firewall / security bindings, monitoring identifiers, and any licensing links intact; changing it can trigger a new IP or policy mismatch.
Step 2: Prepare VMware VM
- Shut down the IEM Virtual VM completely (not paused or suspended)
- Remove all existing VMware snapshots from the VM
- Verify VM is in a clean state without pending operations
Step 3: Export VM from VMware
VMware Workstation:
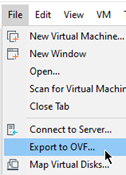
- Select the powered-off IEM Virtual VM
- Open File > Export
- Choose a destination directory with free space (>= VM disk size)
- Confirm export (generates .ovf, .mf, .vmdk file)
- Wait for completion before starting disk conversion
VMware ESXi:
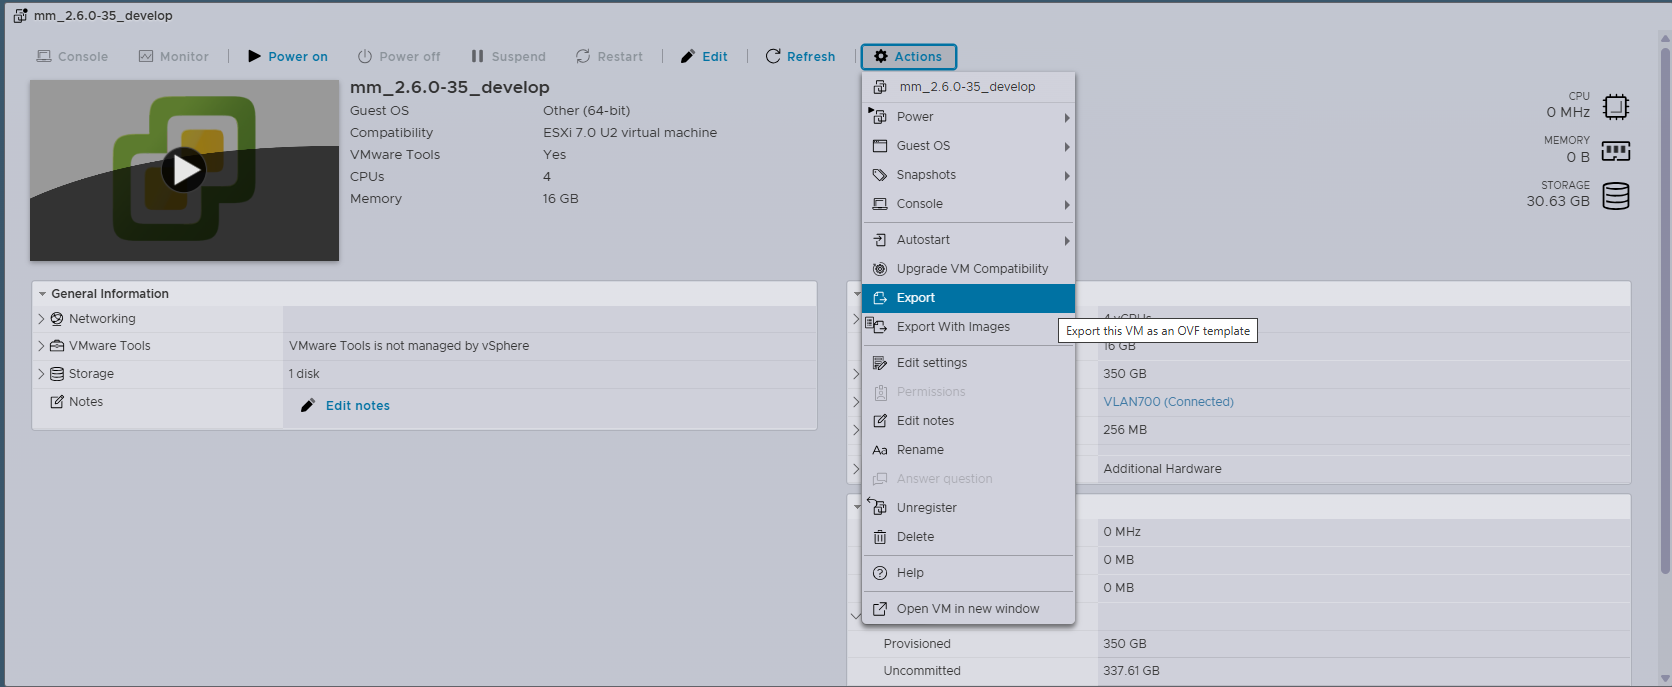
- Select the powered-off IEM Virtual VM
- Select Actions > Export
- Ensure that the vmdk file is selected
- Click Export to start the download process
- Wait for completion before starting disk conversion
Step 4: Convert Disk Format
Install qemu-img on Ubuntu/Debian:
```bash
sudo apt-get update && sudo apt-get install qemu-utils
```
Convert VMDK to VHDX:
qemu-img convert -f vmdk -O vhdx <source.vmdk> <target.vhdx>
Example conversion command:
qemu-img convert -f vmdk -O vhdx iemv-2.6.x-xx-disk1.vmdk iemv-2.6.x-xx-disk1.vhdx
Step 5: Enabling
Prerequisites
Virtualization features need to be enabled in your system BIOS/UEFI and Windows before installing Hyper-V.
Installation - Script Method
-
Copy the content of the installation script:
# Enable Hyper-V feature Enable-WindowsOptionalFeature -Online -FeatureName Microsoft-Hyper-V -All # Add current user to Hyper-V Administrators group Add-LocalGroupMember -Group "Hyper-V Administrators" -Member $env:USERNAME # Restart required message Write-Host "Hyper-V has been enabled. A restart is required to complete the installation." -
Open "Windows PowerShell ISE" with administrative rights
- Paste the code and run it by clicking on the green play button
- Restart your computer when prompted
Installation - Manual Method
- Open PowerShell with administrative rights (required via EPM)
-
Enable the Hyper-V feature:
Enable-WindowsOptionalFeature -Online -FeatureName Microsoft-Hyper-V -All -
Add the user to the Hyper-V Administrators group:
Language-Specific Group Names
The Hyper-V Administrators group name is language-specific. Use the following command to find the exact group name on your system:
Get-LocalGroup | Where-Object {$_.Name -like "*Hyper-V*"}For English systems:
Add-LocalGroupMember -Group "Hyper-V Administrators" -Member $env:USERNAMENote
You don't need to change anything in these commands since they get the username automatically from the environment variables!
-
Restart your computer to complete the Hyper-V installation
Step 6: Create VM in Hyper-V
NOTICE
Resource Configuration Hint Configure the CPU, memory, and disk count according to your last VMware configuration to ensure optimal performance and compatibility, but not less than the minimum recommended resources (4 CPUs, 16GB RAM). You can find these settings in your VMware VM configuration before migration.
- Open Hyper-V Manager
- Select New > Virtual Machine
- Configure the following settings:
- Name: Descriptive VM name
- Location: Path with sufficient storage
- Generation: Generation 2 (UEFI support)
- Memory: 16GB (disable Dynamic Memory)
- Processors: 4 CPUs
- Network: Default Switch or configured virtual switch
- Hard Disk: Use existing virtual hard disk (select your converted .vhdx file)
- Complete the wizard
Step 7: Start VM
- Disable Secure Boot: VM Settings > Security > uncheck "Enable Secure Boot"
- Start VM: Power on through Hyper-V Manager
- Verify Boot: Confirm successful system startup
- Configure Network: Set static IP if required
- Test Functionality: Validate all services operate correctly
Troubleshooting IP Issues in Hyper-V
If you use the Default Switch in Hyper-V, your VM’s IP address may change every time you restart your computer. Sometimes, your VM may not get an IP at all. If you create an external switch, your VM gets an IP, but it can affect your host computer’s internet connection. The IP address can also change after a restart.
-
To find the new IP, check the VM’s console
-
This issue happens every time you restart the host.
Solution: Create a NAT Network
You can set up a NAT network to give your VM a static IP. See the official Windows docs for NAT networks. Set up a NAT network